Pages
▼
Thursday, November 09, 2006
Cookie-stamping Files
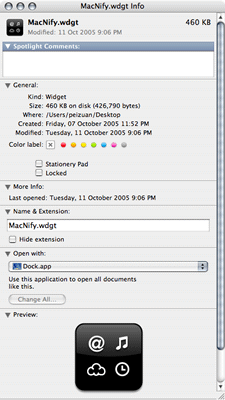
The "Get Info" window is one true hidden gem in Mac OS X. One of the features you will find in Get Info is an option called "Stationery Pad", which basically allows you to create a template out of virtually any file. You can imagine how useful this will be, especially if you always have to create new documents using the same style and formatting, or do calculations in Excel with the same old set of predefined formulas and cell relationships.
Monday, October 23, 2006
Easy Photo Sharing
What fun is there with keeping photos if you can't share them?
Thanks to Flickr, now every can share photos easily. Even if you do not have a Flickr account, you most probably have a Yahoo account, which can be used as your Flickr account right away. Goto flickr.com and set up your account now!
New photos are up on Flickr already. Snappy!
Thanks to Flickr, now every can share photos easily. Even if you do not have a Flickr account, you most probably have a Yahoo account, which can be used as your Flickr account right away. Goto flickr.com and set up your account now!
Easy uploading of photos
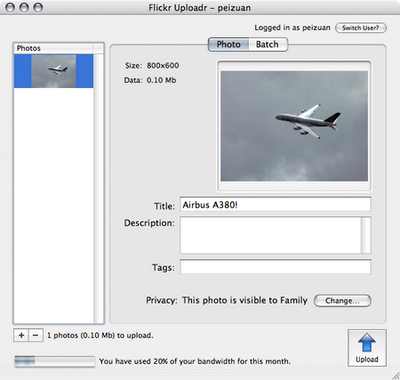
Thanks to the upload tool created by the Flickr team, now you can drag-n-drop your photos/albums from iPhoto and upload them to Flickr with just one click, literally! Get your free copy of Flickr Uploadr from here: http://www.flickr.com/tools/Getting started
When you launch Flickr Uploadr, you will find that you can log on to your Flickr account directly from there. After logging in, you can start uploading photos immediately.Uploading photos
You can simply drag the photos you like to share from iPhoto or Finder into the Uploadr. You can then add tags, descriptions to each photo if you like, or simply click the Upload button and your are done! There are plenty of features like restricting to only friends and families to view the selected photos... I'll leave those for you to figure out.New photos are up on Flickr already. Snappy!
Yet another Mac tip is on the web!
Sunday, October 22, 2006
The Photo Slideshow
Your friend has just sent you a bunch of photos over the internet, and you are deciding to keep those that you like in iPhoto, and ditch the rest.
What is the most gratifying way to carry out the task, and to do it in style?
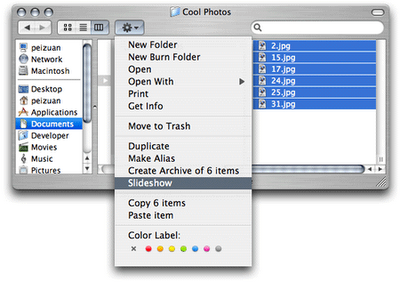
Here is how you can easily set up a slideshow: select all the photos, and look for the "Slideshow" option in the Action menu.
Seeing the photos in fullscreen.
Handy photo index let you see all the photos at once.
However, the neatest thing about Slideshow is how easily Apple has made it for you to add the photos that please you into iPhoto! As always, getting a job done on a Mac is just one click away. Notice the iPhoto button in the control pane? If you happen to like a photo and decide to keep it, all you need to do is to click on that button and it goes right into your iPhoto!
What is the most gratifying way to carry out the task, and to do it in style?
Set up a Slideshow
The photos you got from your friend are most probably wrapped in a zip file. After unzipping them, the photos can be found in a new folder.Here is how you can easily set up a slideshow: select all the photos, and look for the "Slideshow" option in the Action menu.
Taking advantage of the Slideshow
The nice thing about setting up a slideshow, obviously, is allowing you to preview the photos in large format.Seeing the photos in fullscreen.
Handy photo index let you see all the photos at once.
However, the neatest thing about Slideshow is how easily Apple has made it for you to add the photos that please you into iPhoto! As always, getting a job done on a Mac is just one click away. Notice the iPhoto button in the control pane? If you happen to like a photo and decide to keep it, all you need to do is to click on that button and it goes right into your iPhoto!
Yet another Mac tip is on the web!
Wednesday, October 18, 2006
Better Privacy with Firefox
For the privacy-aware Internet users, Safari's Private Browsing is great. But it has a major downside: you cannot set it as system default, meaning you need to activate it every time you think NOT saving private data is crucial.
If you really need that kind of privacy and find Safari's implementation tedious, then forget about Safari altogether. Try Firefox instead.
Open Firefox, choose Preference.
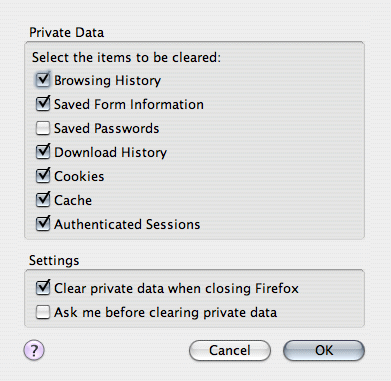
In the "Privacy" Tab, click the "Settings" button at the bottom-right corner.
Then comes a new dialog box, in which you can choose what types of private data you feel compelled to clear. For convenience, check the box "Clear Private data when closing Firefox", and stop worrying from now on!
Disclaimer: The dialog boxes of Firefox Preference are copyrights of Mozilla Foundation. They are displayed solely for the purpose of public education.
If you really need that kind of privacy and find Safari's implementation tedious, then forget about Safari altogether. Try Firefox instead.
Protect Private Data Using Firefox
In Firefox, you can set it to clear your private data each time you close Firefox. If you haven't got one installed, you can get it from the Firefox website.Open Firefox, choose Preference.
In the "Privacy" Tab, click the "Settings" button at the bottom-right corner.
Then comes a new dialog box, in which you can choose what types of private data you feel compelled to clear. For convenience, check the box "Clear Private data when closing Firefox", and stop worrying from now on!
Disclaimer: The dialog boxes of Firefox Preference are copyrights of Mozilla Foundation. They are displayed solely for the purpose of public education.
Yet another Mac tip is on the web!
Tuesday, October 10, 2006
New download link for the MacNify Widget
I recently changed the hosting service to another service provider. What follows is the change of downloading links of the MacNify Widget and the Toggle Widget-On-Top mini app. It may take a while for the guys at Apple to update their widget listings, so here on this post I am providing the links for you to grab those goodies.
Downloads
- MacNify Widget. Tips and tricks for Mac you ought to know!
- Toggle Widget-on-top. Break loose those widgets and place them on your desktop!
Wednesday, July 05, 2006
Video for iPod Made Easy
Ever since the video playing capability is added to the iPod, the truly convenient and easily accessible method for converting one's existing video files into iPod is simply, well, missing.
Then comes iTunes 6.0.5, in which Apple is finally compelled to make the long overdue feature standard and one-click away for the rest of us. Hooray!
At last, we can bypass Quicktime Pro which asks for a fee, or some obsured geeky (but powerful) open-source tools which can only be found by combing through google search results mediculously.
If you haven't got your copy of iTunes updated, go get it now from Apple's iTunes page.
Then comes iTunes 6.0.5, in which Apple is finally compelled to make the long overdue feature standard and one-click away for the rest of us. Hooray!
At last, we can bypass Quicktime Pro which asks for a fee, or some obsured geeky (but powerful) open-source tools which can only be found by combing through google search results mediculously.
How does it work?
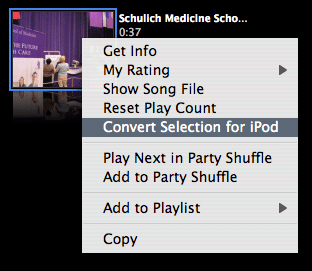
It is suprising easy. Take any video files you have added to your iTunes library and ctrl-click or right-click on it, there you will find the option "Convert Selection for iPod". Nifty huh?If you haven't got your copy of iTunes updated, go get it now from Apple's iTunes page.
File format hazzle
What if you have video files in formats not supported by iTunes? Sorry, but you have no luck with this new feature. In this case, you probably want to try out the amazing ffmpegX.Yet another Mac tip is on the Web!
Thursday, June 22, 2006
Safeguard Your Sensitive Data - Encrypted Disk Image
It is important to know that without encrypting your important files, they are easily obtainable by others who have access to your computer (e.g. when your laptop is stolen); and no, requiring password log-in to your user account does not protect your files from being pried open.
Fortunately, it is very easy to create an encrypted disk image in Mac OS X, which can be mounted to your system when you need it (think USB drive). When dismounted, it becomes just another file on your desktop. But it is strongly encrypted (meaning jumbled up with random data) such that others who obtain this file have no way to read what is inside, and your sensitive data are safe.
In Disk Utility, choose "New Image".
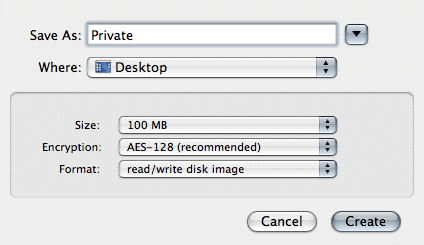
A dialog appears to let you customize the new image. Give it a name and a location to store on your harddisk. You must remember to choose "AES-128" in the Encryption option.
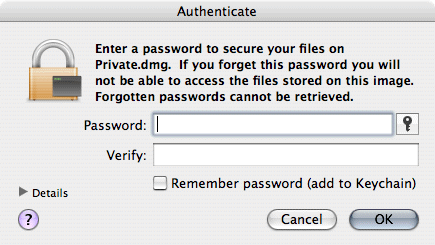
After you click "Create", another dialog will appear for you to create a password to protect the encrypted disk image. For good security, uncheck the "Remember password (store in Keychian)" option so that you leave no trace of your password in your computer. Give it a strong password that is hard to guess, then click 'OK'.
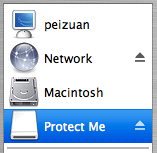
That's all you need to do! Now your new encrypted disk image is ready for use. Just double-click the disk image file, and after you typing in the password, it will be mounted to your system just like a removable drive.
Fortunately, it is very easy to create an encrypted disk image in Mac OS X, which can be mounted to your system when you need it (think USB drive). When dismounted, it becomes just another file on your desktop. But it is strongly encrypted (meaning jumbled up with random data) such that others who obtain this file have no way to read what is inside, and your sensitive data are safe.
Creating an encrypted disk image
First, fire up the Disk Utility.In Disk Utility, choose "New Image".
A dialog appears to let you customize the new image. Give it a name and a location to store on your harddisk. You must remember to choose "AES-128" in the Encryption option.
After you click "Create", another dialog will appear for you to create a password to protect the encrypted disk image. For good security, uncheck the "Remember password (store in Keychian)" option so that you leave no trace of your password in your computer. Give it a strong password that is hard to guess, then click 'OK'.
Using the encryted disk image
That's all you need to do! Now your new encrypted disk image is ready for use. Just double-click the disk image file, and after you typing in the password, it will be mounted to your system just like a removable drive.
Yet another Mac tip is on the web!
Wednesday, May 31, 2006
New MacNify Widget, more bugs solved
Version 1.2 of the MacNify Widget is now officially available for download on Apple's widget directories. Finally, the broken RSS link from the blog to the widget is restored! Enjoy!
Saturday, April 08, 2006
Windows, Anyone?
So it hasn't been any real a big announcement from Apple for quite some time. Try this: Apple is officially enabling running of Microsoft Windows XP natively on the new Intel Mac.
Boot Camp is basically a one-stop-shop tool to help Mac users wishing to run Windows XP on Mac to get things done as easily as possible. It helps you create a new partition on harddisk to house Windows XP without affecting your Mac OS X, and even burns a CD containing the hardware drivers so that you can install them in Windows XP later.
When everything is set up properly, all you need is to hold the option key when starting the machine and the system will prompt you to choose which operating system to launch.
For a complete instruction on using Boot Camp, check out Apple's Boot Camp Guide
Alternatively, you can see a video demo of Boot Camp at You Tube
Personally, I think this isn't really as big a change in the Mac world. First of all, those who enjoy Mac OS X will stick to Mac OS X, while those who have needed Windows for whatever reasons will still install a copy of Windows alongside Mac OS X -- only to bypass the Virtual PC for the first time in history. However, it sure will entice Mac users who happen to be active gamers to try out Boot Camp, as most of the major game titles are still Windows-only.
Boot Camp does it all
As Windows XP is built for the x86 architecture, it should naturally run well on the Intel Mac --that is if other compatibility issues like hardware drivers are overcome. That's precisely what Boot Camp (Beta) does.Boot Camp is basically a one-stop-shop tool to help Mac users wishing to run Windows XP on Mac to get things done as easily as possible. It helps you create a new partition on harddisk to house Windows XP without affecting your Mac OS X, and even burns a CD containing the hardware drivers so that you can install them in Windows XP later.
When everything is set up properly, all you need is to hold the option key when starting the machine and the system will prompt you to choose which operating system to launch.
For a complete instruction on using Boot Camp, check out Apple's Boot Camp Guide
Alternatively, you can see a video demo of Boot Camp at You Tube
A real buzz generator
If you happen to scout around the Web for news and comments surrounding this new tool from Apple, you may find equally extreme yet completely opposite opinions, like the death of Mac OS X and the death of Windows. Take your pick.Personally, I think this isn't really as big a change in the Mac world. First of all, those who enjoy Mac OS X will stick to Mac OS X, while those who have needed Windows for whatever reasons will still install a copy of Windows alongside Mac OS X -- only to bypass the Virtual PC for the first time in history. However, it sure will entice Mac users who happen to be active gamers to try out Boot Camp, as most of the major game titles are still Windows-only.
Security security
Mac is as safe as the Mac OS X can be. When comes to security with Windows, it doesn't matter that you are actually running it in your shiny Mac machine, worms targeting Windows will still creep in. Go ahead and install a copy of Windows if you may, but be sure you know what you are doing.Yet another Mac tip is on the web!
Tuesday, March 07, 2006
Safari's Hole Patched
Apple has responded to the security hole in Safari reported a few weeks ago by releasing a security update, formally Security Update 2006-001 Mac OS X 10.4.5 (PPC).
The turnaround time of the fix is fast enough, which is a good sign that Apple is taking Mac security seriously. If your system has not been patched, you can download and install the update using the Mac's built-in Software Update, or get it from this link.
Problem solved
After updating the system, I found that the aforementioned vulnerability in Safari is gone. Now the download manager is able to decipher the altered script files and warn that the package may contain an application. Since you know you are downloading a media file, this warning is enough to raise your alert that something fishy is going on.The turnaround time of the fix is fast enough, which is a good sign that Apple is taking Mac security seriously. If your system has not been patched, you can download and install the update using the Mac's built-in Software Update, or get it from this link.
What about Panther
Fear not, Panther users, for you are not neglected. Apple has also addressed this problem in Panther by releasing a 10.3.9 security update, which can be downloaded here: http://docs.info.apple.com/article.html?artnum=303382.Yet another Mac tips is on the web!
Tuesday, February 28, 2006
Apple's February Special Event
It's only a couple of hours before Apple's February 2006 special event kick-starts. What will Apple reveal this time?
Rumors ranging from the new Intel Macs to the bigger-screen video iPod have been around recently. MacNify has never participated in any of these guess-works, with an exception this time.
So what is my take? I think it must be something to do with video. The rest will fit in around this theme. My focus is drawn to the recent acquisition of Pixar by Disney, which made Steve Jobs the CEO of Apple the biggest share holder of Disney. Although technically that has nothing to do with Apple, I am sure the collaboration between the Disney and Apple is too sweet a spot to not to be taken seriously by the two company. And having Steve sitting in Disney's board means something must happen.
So what will Apple do? Working around the theme of video, I guess Apple will start selling movies on its iTunes music store. However, that alone is not enough to draw people to buy movies online. To create a positive spiral effect like what iPod does to the selling of music on iTunes and vice versa, Apple has to roll out a new iPod to sell movies. That leads to the so-called 'true' video iPod, which is mentioned on Think Secret, with its argument further strengthen by a touch-screen patent filed by Apple. Apple may also introduce yet another Intel Mac with FrontRow, preferably the Mac Mini, so that people can purchase movies online and watch them directly on their big-screen TV.
Will my guess be accurate? We will find out soon enough.
Friday, February 24, 2006
Major Vulnerability in Safari
Michael Lehn, a PhD student in Denmark, has discovered a security hole in Safari that every Mac user should be cautioned about. As of writing, Apple Computer Inc. has yet released a patch. It did release 10.4.5, the latest upgrade of its Mac OSX, slightly before the vulnerability was made public. But after installing on my machine the vulnerability still persists.
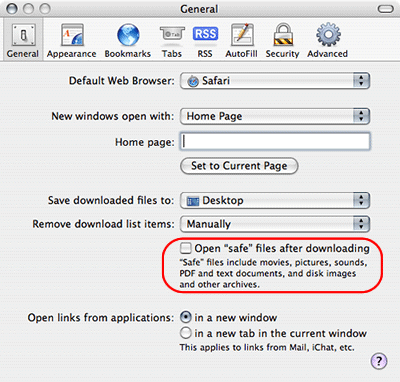
Before running the test, you will need to set your Safari to open 'Safe' files automatically. You can locate the settings at Safari->Preference.
Follow the instructions on the website on where to click in order to download a file which is seen as 'safe' by Safari. The goal is to test whether the file will be opened automatically, which it shouldn't. Upon opening the file it runs a benign script that attempts to launch the Calculator app. When the calculator pops up, you are NOT safe.
The test provided by Secunia demonstrates that a hacker can decorate malicious shell scripts to look like 'safe' files. Keep in mind that the UNIX shell scripting is a very powerful tool, capable of performing a lot of admin-level exercise on the computer, so you really don't want some jokers to run scripts as will on your machine.
Are you safe?
To allow Mac users find out whether their machines are safe, Secunia, a security company, has provided a test on its website http://secunia.com/advisories/18963.Before running the test, you will need to set your Safari to open 'Safe' files automatically. You can locate the settings at Safari->Preference.
Follow the instructions on the website on where to click in order to download a file which is seen as 'safe' by Safari. The goal is to test whether the file will be opened automatically, which it shouldn't. Upon opening the file it runs a benign script that attempts to launch the Calculator app. When the calculator pops up, you are NOT safe.
A look inside the hole
'Safe' files in Safari include movies, pictures, audio, PDF, archives etc. One might argue that opening these files automatically is a convenient feature, but it is always a bad feature in terms of security.The test provided by Secunia demonstrates that a hacker can decorate malicious shell scripts to look like 'safe' files. Keep in mind that the UNIX shell scripting is a very powerful tool, capable of performing a lot of admin-level exercise on the computer, so you really don't want some jokers to run scripts as will on your machine.
Prevention is better than cure
Apple is working on 10.4.6 now. I believe they will patch this hole with the release. That said, opening downloaded files automatically is always a bad idea. To stop this kind of threat once and for all, you should turn off the option.Final note
Always accept files only from sources you can trust, and do not open suspicious files simply out of curiosity! This way you will save yourself from many troubles!Yet another Mac tips is on the web!

Saturday, February 18, 2006
Converting Video Files for iPod
Got the latest iPod? What about the video contents?
The problem most iPod G5 owners face is not about where to find videos, but rather how to make their existing collection of videos play on the iPod. In this article we will talk about converting video files of almost any sort into files that play on the iPod G5.
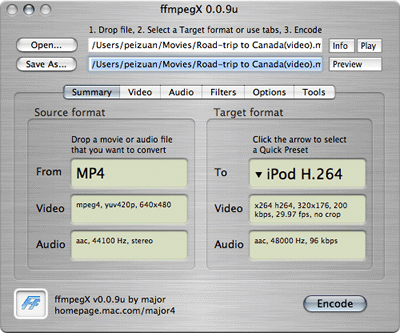
Apple's Quicktime Pro is just one of the many tools available for converting video files into iPod-friendly formats. However, when talking about versatility, there is probably none that deals with so many different formats, including Real (.rm / .rmvb), as does ffmpegX. Plus, you can try it for free!
Talking about ease of use, you practically need not know any better than how to drag-n-drop using a mouse to get job done. That alone makes ffmpegX a must-have. I don't mean to steal the thunder from ffmpegX's comprehensive "how-to's" on its own website, so I suggest you read the instructions there to find out how to operate the program.
Screenshot of ffmpegX.
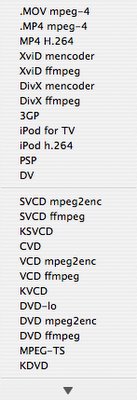
The preconfigured output formats in ffmpegX.
Screenshots of a iPod-friendly video. Image and sound is perfectly in sync, no problem!
(See also: "Watch Podcast?")
The problem most iPod G5 owners face is not about where to find videos, but rather how to make their existing collection of videos play on the iPod. In this article we will talk about converting video files of almost any sort into files that play on the iPod G5.
Apple's Quicktime Pro is just one of the many tools available for converting video files into iPod-friendly formats. However, when talking about versatility, there is probably none that deals with so many different formats, including Real (.rm / .rmvb), as does ffmpegX. Plus, you can try it for free!
Where to get ffmpegX
You can download a copy of ffmpegX at http://homepage.mac.com/major4/download.htmlUsing ffmpegX to prepare iPod-friendly video
By its sheer power, ffmpegX simply overkills in serving our purpose. However, it does provide preconfigured settings for making iPod-friendly video so you don't have to worry about file format, bit rate, pixel count and all that jazz -- which means ffmpegX has got the most painstaking part of converting video formats covered!Talking about ease of use, you practically need not know any better than how to drag-n-drop using a mouse to get job done. That alone makes ffmpegX a must-have. I don't mean to steal the thunder from ffmpegX's comprehensive "how-to's" on its own website, so I suggest you read the instructions there to find out how to operate the program.
Screenshot of ffmpegX.
The preconfigured output formats in ffmpegX.
Screenshots of a iPod-friendly video. Image and sound is perfectly in sync, no problem!
Importing videos into iTunes
After you've got the new file produced by ffmpegX, drag-n-drop it into iTunes, so that it can be transferred to your iPod. If your iTunes is set to copy all imported files into iTunes's folder, you can remove the original one after iTunes has finished importing.(See also: "Watch Podcast?")
Yet another Mac tip is on the web!
Wednesday, January 18, 2006
It's About Getting the Right Info
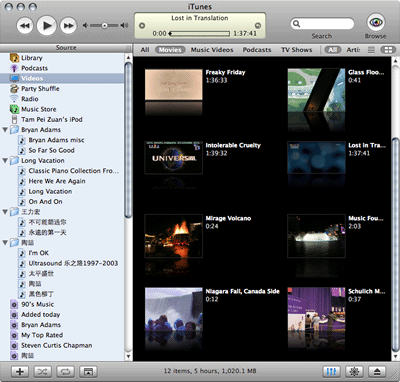
The "Get Info" function in Finder is a very handy tool in Mac OS X. It gives you very extensive information of the files in your computer.
Opening the Info Window in Finder
First of all, you need to select a file or a few files. Then you will need to open the "Info Window" of the selected files. There are four ways to open the Info Window of the selected file(s) in Finder.- From the menu bar, choose "File"->"Get Info"
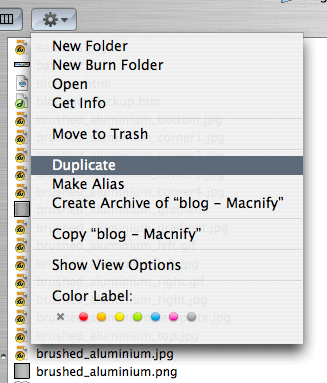
- Click the Action button on the top left corner of the Finder window, and choose "Get Info" from the drop-down menu.
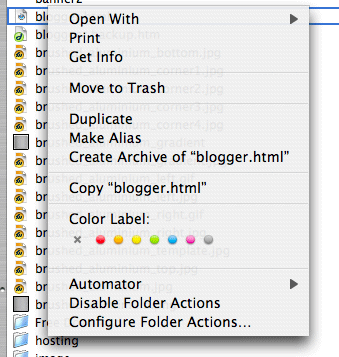
- Right-click or ctrl+click on the selected file(s) and choose "Get Info" from the drop-down menu.
- Type the shortcut key "command+i", my personal favorite.
More than just seeing information
The Info Window allows you to modify the metadata and many other attributes of a file. Depending on the file types, there may be different options for you to see and change. Typically, you can change the default program in which a file is launch, the ownership and access right of a file, the icon etc. If you are using Tiger (Mac OS X 10.4), you can assign descriptive keywords as "Spotlight Comments" which helps Spotlight pinpoint a specific file or a number of files by those keywords.Seeing collective information of multiple files
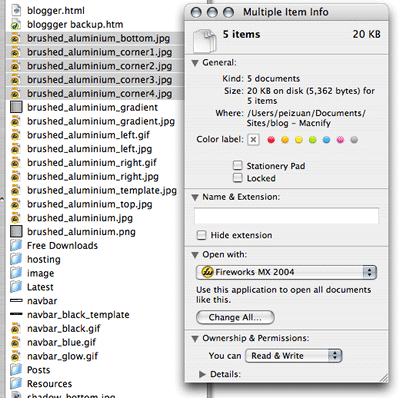
You may have noticed that using the "Get Info" command on a number of files will open just the same number of Info Windows altogether, one for each file. Such a behavior is awfully ugly, especially when you just want to see collective information like the total file size.To see the collective information of the multiple-selected files in one Info Window, just hold the ctrl key when you execute the "Get Info" command. E.g., hold the ctrl key when you mouse-click the "Get Info" or when you type the "command+i" shortcut key.Yet another Mac tip is on the web!
Sunday, January 08, 2006
The Post-holiday iPhoto Dilemma
Photo taking with digital camera is fun until you start tagging the photos in iPhoto. There are two aspects of the job that I personally find painstaking:
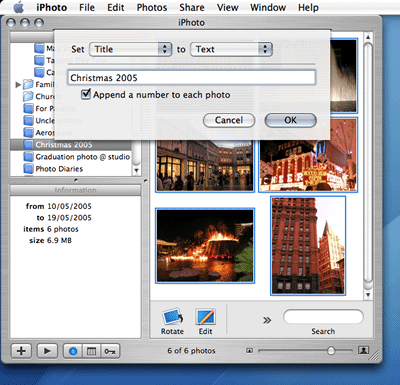
A number is added to the tail of the title "Christmas 2005". Numbers are added in ascending order, i.e. 1, 2, 3...
- typing repetitive keywords into the titles and comments of a collection of photos
- moving focus/selection to another photo while manually adding comments to the photos
Adding keywords to a collection of photos
I always like to add descriptive keywords to a set of photos for archiving and quick searching purposes. For example, I would add "Christmas 2005" at the beginning of the titles of all the pictures I took in the last holiday season. To do this, the "batch change" function found in the "Photo" menu comes in handy.- Select a set of photos and click the batch change function.
- In the new pop-up dialog, you can modify or append to the title, date and comments of the selected photos. If you are modifying the title, you can even tell iPhoto to add a number to each photo.
A number is added to the tail of the title "Christmas 2005". Numbers are added in ascending order, i.e. 1, 2, 3...
Moving between photos while tagging
When you are editing photo info manually, you would rather have your hands staying to the keyboard instead of moving over to the mouse just to navigate the photos.- To move to the next photo, click command+]
- To move to the previous one, click command+[