Saturday, April 26, 2008

Note-taking in Preview 1: The Highlighter

We all do a little article research once a while. Whether you found the articles from online journals or through the course reserves in your college library, chances are, they come in PDF format. If you are like me, you wouldn't care to print the articles out; reading them in Preview does it, thank you very much.

When reading on paper, we like to make the black-and-white printouts a little more exiting by highlighting and note-taking at the side. Well, we can do just that in Preview.

In this series, I will share a couple of tips on article reading using Preview, starting with the virtual highlighter.

Text Highlighter in Preview


Let's say you have your text PDF file opened in Preview. Here are the steps to mark up a snippet of the text:

  1. Use your cursor to select(highlight) the text snippet.

  2. Look for the "Mark Up" function in the toolbar or under "Tools" in the menu bar.

  3. If you want the mark up to stay permanent, remember to re-save the PDF document.


That's it!

Use Different Colors


If you don't like the default color Preview assumes, or you like to use multiple colors just like you have many different highlighters in the physical world, you will love the color palette.


Goto Tools in the menu bar, and select "Show Colors". The color palette will show up on screen. I like to keep the color palette open side-by-side with the article I am reading, since I like change the mark up colors all the time. It is super handy!

That's it folks, more tips on Preview are on the way. Stay tuned!


Yet another Mac Tips is on the web!

Saturday, March 29, 2008

MacNify Widget 2.0 Now Available!

MacNify proudly presents the MacNify widget version 2.0. The widget gains new look, consistent with the new Leopard theme on the website. Underneath the new shiny surface are great improvements including:
  • A lot more reliable RSS feed control.
  • Ability to control length article summary on the widget.

Download

Get MacNify Widget.

As always, MacNify is a great way to discover cool and useful Mac tricks like blowing up the screen or placing dashboard widgets directly on your desktop. MacNify widget makes learning a lot easier by brining the tips right onto your desktop.

User Instructions


  1. One-click to read the full article in default browser.
  2. One-click to take you to MacNify homepage.
  3. Scroll bar.
  4. Move slider to the left for shorter article summary; right for longer article summary.


Yet another Mac tip is on the web!

Sunday, January 14, 2007

Blow up your screen. Sorta

Do you love the crisp, clean text and graphics your mac is capable of producing on your screen? Sure do... but not everyone does. The grandpa and grandma of the mac users do need serious magnification in order to see the incredibly small and defined objects on the flat panel.

Again, MacNify is spilling out the coolest trick to get things done - in this case, blowing your screen.

The trick

Hold the "shift" and "ctrl" key, and do a scroll-up using your mouse's scroll button. Or equivalently, use your two fingers to scroll up on your MacBook's trackpad. You simply get a zoom-in effect of everything on screen, REALTIME! Still holding the keys and do a scroll-down, and you can gradually zoom out again. Ain't that cool?

Look at how much I have zoomed-in on the Apple logo! But things get a little blurry if you overdo it.


Yet another Mac tip is on the web!

Thursday, November 09, 2006

Cookie-stamping Files

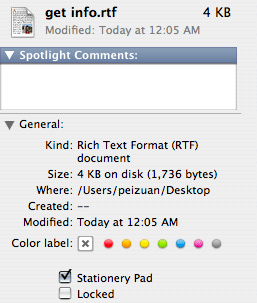
The "Get Info" window is one true hidden gem in Mac OS X. One of the features you will find in Get Info is an option called "Stationery Pad", which basically allows you to create a template out of virtually any file. You can imagine how useful this will be, especially if you always have to create new documents using the same style and formatting, or do calculations in Excel with the same old set of predefined formulas and cell relationships.

Opening the "Get Info" window

You can select any file and type command+i to bring up its "Get Info" window. For more details on working with this and the related commands, see It's about getting the right info.

Creating a template out of any file

To turn a file into a template, just select the "Stationery Pad" option in the Get Info window. Unfortunately, there is no visual sign on the file icon telling you that a file has been turn into a "Stationery Pad".

Using "Stationery Pad" files

The next time you double click to open a file marked as "Stationery Pad", the program responsible for this file will actually open a new untitled file but with all the content in "Stationery Pad" file. If you do a "Save" command, you will save a new file while leaving the original file untouched. How great!

Yet another Mac tip is on the web!