Showing posts with label Utilities. Show all posts

Saturday, April 26, 2008

Note-taking in Preview 1: The Highlighter

We all do a little article research once a while. Whether you found the articles from online journals or through the course reserves in your college library, chances are, they come in PDF format. If you are like me, you wouldn't care to print the articles out; reading them in Preview does it, thank you very much.

When reading on paper, we like to make the black-and-white printouts a little more exiting by highlighting and note-taking at the side. Well, we can do just that in Preview.

In this series, I will share a couple of tips on article reading using Preview, starting with the virtual highlighter.

Text Highlighter in Preview


Let's say you have your text PDF file opened in Preview. Here are the steps to mark up a snippet of the text:

  1. Use your cursor to select(highlight) the text snippet.

  2. Look for the "Mark Up" function in the toolbar or under "Tools" in the menu bar.

  3. If you want the mark up to stay permanent, remember to re-save the PDF document.


That's it!

Use Different Colors


If you don't like the default color Preview assumes, or you like to use multiple colors just like you have many different highlighters in the physical world, you will love the color palette.


Goto Tools in the menu bar, and select "Show Colors". The color palette will show up on screen. I like to keep the color palette open side-by-side with the article I am reading, since I like change the mark up colors all the time. It is super handy!

That's it folks, more tips on Preview are on the way. Stay tuned!

Yet another Mac Tips is on the web!

Sunday, January 14, 2007

Blow up your screen. Sorta

Do you love the crisp, clean text and graphics your mac is capable of producing on your screen? Sure do... but not everyone does. The grandpa and grandma of the mac users do need serious magnification in order to see the incredibly small and defined objects on the flat panel.

Again, MacNify is spilling out the coolest trick to get things done - in this case, blowing your screen.

The trick

Hold the "shift" and "ctrl" key, and do a scroll-up using your mouse's scroll button. Or equivalently, use your two fingers to scroll up on your MacBook's trackpad. You simply get a zoom-in effect of everything on screen, REALTIME! Still holding the keys and do a scroll-down, and you can gradually zoom out again. Ain't that cool?

Look at how much I have zoomed-in on the Apple logo! But things get a little blurry if you overdo it.


Yet another Mac tip is on the web!

Thursday, June 22, 2006

Safeguard Your Sensitive Data - Encrypted Disk Image

It is important to know that without encrypting your important files, they are easily obtainable by others who have access to your computer (e.g. when your laptop is stolen); and no, requiring password log-in to your user account does not protect your files from being pried open.

Fortunately, it is very easy to create an encrypted disk image in Mac OS X, which can be mounted to your system when you need it (think USB drive). When dismounted, it becomes just another file on your desktop. But it is strongly encrypted (meaning jumbled up with random data) such that others who obtain this file have no way to read what is inside, and your sensitive data are safe.

Creating an encrypted disk image

First, fire up the Disk Utility.
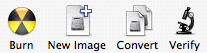
In Disk Utility, choose "New Image".
A dialog appears to let you customize the new image. Give it a name and a location to store on your harddisk. You must remember to choose "AES-128" in the Encryption option.
After you click "Create", another dialog will appear for you to create a password to protect the encrypted disk image. For good security, uncheck the "Remember password (store in Keychian)" option so that you leave no trace of your password in your computer. Give it a strong password that is hard to guess, then click 'OK'.

Using the encryted disk image


That's all you need to do! Now your new encrypted disk image is ready for use. Just double-click the disk image file, and after you typing in the password, it will be mounted to your system just like a removable drive.


Yet another Mac tip is on the web!

Saturday, April 08, 2006

Windows, Anyone?

So it hasn't been any real a big announcement from Apple for quite some time. Try this: Apple is officially enabling running of Microsoft Windows XP natively on the new Intel Mac.

Boot Camp does it all

As Windows XP is built for the x86 architecture, it should naturally run well on the Intel Mac --that is if other compatibility issues like hardware drivers are overcome. That's precisely what Boot Camp (Beta) does.
Boot Camp is basically a one-stop-shop tool to help Mac users wishing to run Windows XP on Mac to get things done as easily as possible. It helps you create a new partition on harddisk to house Windows XP without affecting your Mac OS X, and even burns a CD containing the hardware drivers so that you can install them in Windows XP later.

When everything is set up properly, all you need is to hold the option key when starting the machine and the system will prompt you to choose which operating system to launch.

For a complete instruction on using Boot Camp, check out Apple's Boot Camp Guide

Alternatively, you can see a video demo of Boot Camp at You Tube

A real buzz generator

If you happen to scout around the Web for news and comments surrounding this new tool from Apple, you may find equally extreme yet completely opposite opinions, like the death of Mac OS X and the death of Windows. Take your pick.

Personally, I think this isn't really as big a change in the Mac world. First of all, those who enjoy Mac OS X will stick to Mac OS X, while those who have needed Windows for whatever reasons will still install a copy of Windows alongside Mac OS X -- only to bypass the Virtual PC for the first time in history. However, it sure will entice Mac users who happen to be active gamers to try out Boot Camp, as most of the major game titles are still Windows-only.

Security security

Mac is as safe as the Mac OS X can be. When comes to security with Windows, it doesn't matter that you are actually running it in your shiny Mac machine, worms targeting Windows will still creep in. Go ahead and install a copy of Windows if you may, but be sure you know what you are doing.


Yet another Mac tip is on the web!

Wednesday, January 18, 2006

It's About Getting the Right Info

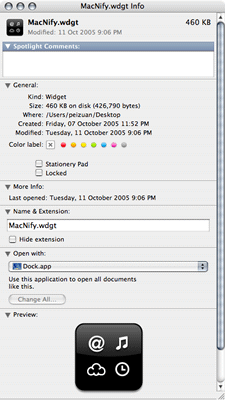
The "Get Info" function in Finder is a very handy tool in Mac OS X. It gives you very extensive information of the files in your computer.

Opening the Info Window in Finder

First of all, you need to select a file or a few files. Then you will need to open the "Info Window" of the selected files. There are four ways to open the Info Window of the selected file(s) in Finder.
  • From the menu bar, choose "File"->"Get Info"
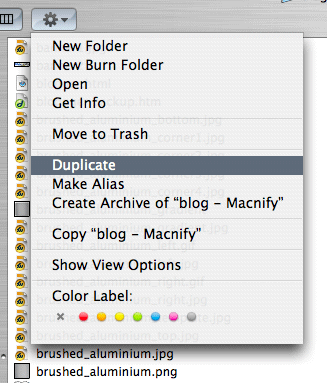
  • Click the Action button on the top left corner of the Finder window, and choose "Get Info" from the drop-down menu.
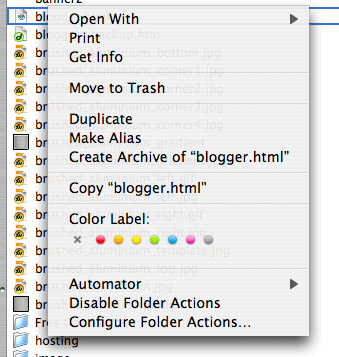
  • Right-click or ctrl+click on the selected file(s) and choose "Get Info" from the drop-down menu.
  • Type the shortcut key "command+i", my personal favorite.

More than just seeing information

The Info Window allows you to modify the metadata and many other attributes of a file. Depending on the file types, there may be different options for you to see and change. Typically, you can change the default program in which a file is launch, the ownership and access right of a file, the icon etc. If you are using Tiger (Mac OS X 10.4), you can assign descriptive keywords as "Spotlight Comments" which helps Spotlight pinpoint a specific file or a number of files by those keywords.
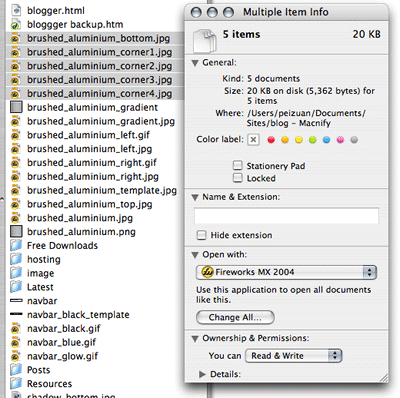
Seeing collective information of multiple files

You may have noticed that using the "Get Info" command on a number of files will open just the same number of Info Windows altogether, one for each file. Such a behavior is awfully ugly, especially when you just want to see collective information like the total file size.To see the collective information of the multiple-selected files in one Info Window, just hold the ctrl key when you execute the "Get Info" command. E.g., hold the ctrl key when you mouse-click the "Get Info" or when you type the "command+i" shortcut key.


Yet another Mac tip is on the web!

Wednesday, November 30, 2005

Filtering Spotlight Search in Finder

Since the launch of Mac OS 10.4 aka Tiger, Apple has replaced the "Search" box on Finder with Spotlight search.

While it is much more convenient to access Spotlight at the menu bar, its straightforward style of searching often produce a bloated result that may not satisfy you. To do a filtered search, Finder would be a better place to go.

Filtered Search

In Finder, type something in the Search box, and the Finder window will instantly switch to showing Spotlight search results. There is a "Save" button for you to save your search results to something called the Smart Folder, and a "+" button to add filtering options.

You can add multiple filters to a search result. For example, if you want to search for photos associated with "lake" that is taken within last two years using an Olympus camera, you can add the filters in the order of "Kind", "Created" and "Device make".

Smart use of "Smart Folder"

If I were to grudge about Spotlight in Finder, it would the arrangement whereby search filters are hidden from the user until the user starts punching stuff into the Search box.

The work-around method is to always keep Smart folder at the Finder sidebar, and name it so something general, like "Search".
Whenever you want to set up filters before doing an actual search, you can open the general Smart Folder and the filters are already your service right away.


Yet another Mac tip is on the Web!

Saturday, November 19, 2005

Killing Dashboard Widgets the Jedi's Way

When you get bored of a widget (hopefully not the MacNify widget), you probably will want to get rid of it and free up some precious screen space.

To close a widget, you click the little "x" button which can usually be found at the top-left corner of the widget. But first you will need to make those "x" buttons show up on screen, a move that can be very clumsy unless the force is with you.

The standard way

The standard way of closing a door is to walk to door and close it. The standard way of closing a widget is to pull out the widget panel, which also causes the "x" buttons of all the widgets to show up on screen, then click on the one that belongs to the widget you wish to close.

The Jedi's way

The jedi's way of closing the door is to remain at where you are and force-grib the door to close it. The jedi's way of closing a widget is to press-hold the option key and mouse-over the widget, a trick which reveals the "x" button of that widget alone, then click on the button and close the widget.
Besides being the über cool way of closing a widget, this trick is the only way to close the widgets you have placed outside the dashboard.

Go kill the Sith... I mean widgets

Your training is now over. Go to the Dashboard System at the outer rim and destroy as many widgets as you wish. May the force be with you.

There I said it all. Now's your turn to translate this article into Yoda's grammar.

Yet another Mac tip is on the Web!

Sunday, November 13, 2005

Creating PDF files from anything

Creating PDF files in Mac OS X is easy, and its FREE! If you are coming from the Windows world, you will come to appreciate this great advantage over the PDF experience on Windows.

Why PDF?

Why should you care about creating PDF files?

The reasons are plenty, but the most important one is document portability. By portability, it means more than just moving computer files around. PDF is meant for preserving the presentation (i.e. the formating) of a document across all platforms. It is a digital equivalence to the paper-printed documents: the content and the presentation of content remain consistent no mater who you pass it to. Because of this property, PDF is already the de facto standard for data exchanged in the internet age. Most government agencies and banks now provide downloadable application forms in PDF format. Universities and professional groups are also requiring research papers to be submitted in PDF format.

Other reasons include privacy protection by means of encryption and password protection, and many more. For more information about PDF, check out this cool website by Adobe, the print expert company that initiated the format.

A simple tutorial

Let's create a PDF file from a webpage.
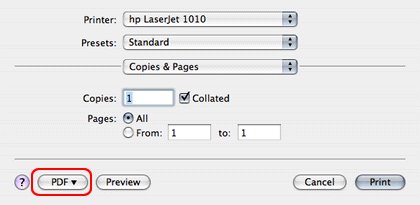
  1. In Safari, open the 'Print' dialog, then look for the 'PDF' button.

  2. Click the 'PDF' button to reveal the PDF options, then choose 'Save as PDF' (the organization of the options may vary in different versions of Mac OS X, it doesn't matter).

  3. Give a name to the PDF file and click Save. That's it!

Note: You can create PDF file from anything that can be printed with the pinter.. that's basically everything!

Screenshots of MacNify.PDF

A PDF file named 'MacNify.pdf' is created.


Screenshot of MacNify.pdf.

Adobe Acrobat Professional

While Mac's support for PDF is impressive, it lacks the complete set of advanced functions found in Adobe's products. If you need to do more than just distributing documents, e.g. creating fillable forms, you may need Adobe Acrobat Professional (Amazon Link). Otherwise, save the bucks for your next iPod, Mac's support is good enough.

Friday, November 04, 2005

Free Your Widgets From Dashboard (Part II)

The "Toggle Widget-On-Top" mini app is finally here!

Since we talked about putting dashboard widgets directly on the desktop, I promised there will be a Part II, which makes the mini app available. I, for one, have been waiting to see the promise fulfilled. The day has finally come, and it's TODAY!

Get the mini app

If you are hardcore about doing the UNIX command yourself, follow the instructions in Part I. Else, download the mini-app and be happy!

Click the icon to download the mini app.

Run the mini app

  1. If you are using Safari to download the mini app, it should automatically unzip and mount the disk image for you. Else, unzip it manually and double click the .dmg file to mount the disk image yourself.

  2. Once you get the the disk image mounted, the rest are just usual routines. You can either run the mini app directly, or copy it to your Application folder and run it from there.


Show me the Mm...magic!

You are good to go after running the mini app. Now let's do the trick!
  1. Launch dashboard by clicking the dashboard toggle key (e.g. F12, depending on your settings in Preference->'Dashboard & Exposé').

  2. Click on any widget and drag a little. Here's the catch: while dragging, hit the dashboard toggle key once. WHALAH! Now the widget is on your desktop, and it stays on top of all windows, all the time!
*repeating step 2 with the widgets on your desktop will bring them back to dashboard.

Show it off

With this trick you can now use your favorite widgets without even launching the Dashboard, and perhaps wow a few friends who don't read MacNify!

Yet another Mac tip is on the web!