Wednesday, November 30, 2005

Filtering Spotlight Search in Finder

Since the launch of Mac OS 10.4 aka Tiger, Apple has replaced the "Search" box on Finder with Spotlight search.

While it is much more convenient to access Spotlight at the menu bar, its straightforward style of searching often produce a bloated result that may not satisfy you. To do a filtered search, Finder would be a better place to go.

Filtered Search

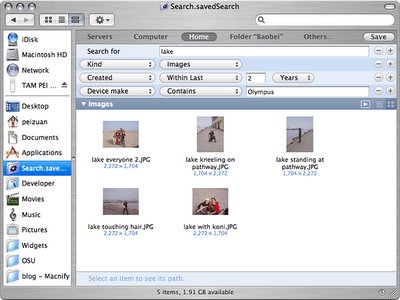
In Finder, type something in the Search box, and the Finder window will instantly switch to showing Spotlight search results. There is a "Save" button for you to save your search results to something called the Smart Folder, and a "+" button to add filtering options.

You can add multiple filters to a search result. For example, if you want to search for photos associated with "lake" that is taken within last two years using an Olympus camera, you can add the filters in the order of "Kind", "Created" and "Device make".
Smart use of "Smart Folder"

If I were to grudge about Spotlight in Finder, it would the arrangement whereby search filters are hidden from the user until the user starts punching stuff into the Search box.

The work-around method is to always keep Smart folder at the Finder sidebar, and name it so something general, like "Search".
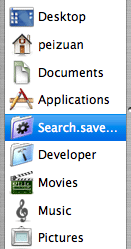
Whenever you want to set up filters before doing an actual search, you can open the general Smart Folder and the filters are already your service right away.


Yet another Mac tip is on the Web!

Wednesday, November 23, 2005

Happy Thanksgiving! Fun with the Weather Widget

Happy Thanksgiving to the MacNify readers in the USA!

It's a great weekend, so we shall have something not entire useful, but FUN! When your work on the computer gets dull, the weather widget may provide you some unexpected entertainment.

Slow-mo the weather man

We all know that clicking on the weather widget will reveal or retract the 6-day forecast. However, it is not popularly known that doing a shift+click will turn this action into a slow motion.

If only you can dictate the weather

Too bad we can't. No matter which corner of the globe you are at, you hardly get all types of weathers in one place, but you can still have fun looping through all the weather types that the weather widget knows.

When you do a option+command+click, the weather location changes to 'Nowhere'. Every time you do this, the weather graphic changes to a different one. See if you can get what every graphic means!

When the fun is over and you want the weather widget to point back to your preset location, just select the weather widget and do a command+r to reload it.

Yet another Mac tip is on the web!

Saturday, November 19, 2005

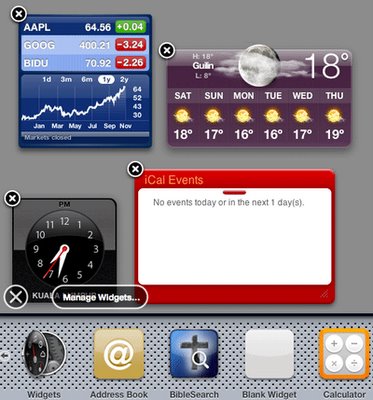
Killing Dashboard Widgets the Jedi's Way

When you get bored of a widget (hopefully not the MacNify widget), you probably will want to get rid of it and free up some precious screen space.

To close a widget, you click the little "x" button which can usually be found at the top-left corner of the widget. But first you will need to make those "x" buttons show up on screen, a move that can be very clumsy unless the force is with you.

The standard way

The standard way of closing a door is to walk to door and close it. The standard way of closing a widget is to pull out the widget panel, which also causes the "x" buttons of all the widgets to show up on screen, then click on the one that belongs to the widget you wish to close.

The Jedi's way

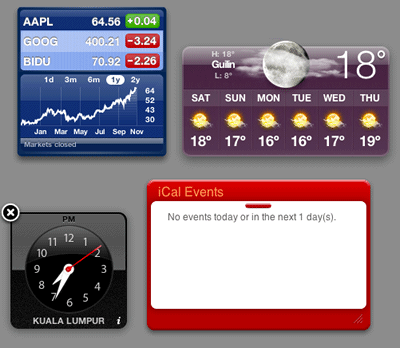
The jedi's way of closing the door is to remain at where you are and force-grib the door to close it. The jedi's way of closing a widget is to press-hold the option key and mouse-over the widget, a trick which reveals the "x" button of that widget alone, then click on the button and close the widget.
Besides being the über cool way of closing a widget, this trick is the only way to close the widgets you have placed outside the dashboard.

Go kill the Sith... I mean widgets

Your training is now over. Go to the Dashboard System at the outer rim and destroy as many widgets as you wish. May the force be with you.

There I said it all. Now's your turn to translate this article into Yoda's grammar.

Yet another Mac tip is on the Web!

Tuesday, November 15, 2005

Instant RSS with Safari 2.0

RSS as news aggregator

The header of this paragraph basically says it all. Some big-time executives and politicians don't read news directly off the newspaper, website or TV. Rather, they have their news secretaries gather the news articles and format them nicely on clean pages. Taking the real-world analogy to the digital world, RSS (Really Simple Syndication) is the news secretary for you and me.

RSS out-of-the-box

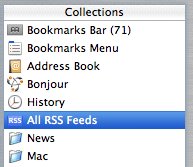
Even if you have not used RSS before, chances are that your Tiger is shipped with tons of feed together with Safari 2.0 (aka Safari RSS). First, open the bookmark page, and find your "All RSS Feeds" bookmark at the sidebar.
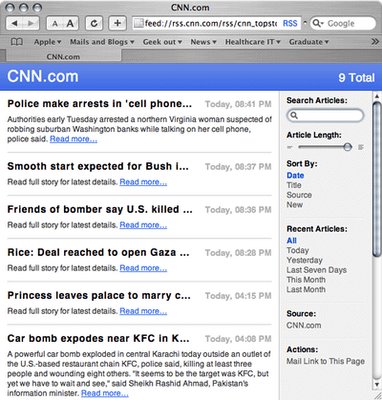
On the right hand side are all the RSS feeds that your Safari has subscribed to. Click on one of them to see what's inside. I choose the CNN feed, and up comes the news titles from CNN presented in a clean list. If you click on any news title, it will bring you right to the corresponding news article on CNN's website. Notice the blue-colored "RSS" at the right hand side of the address bar? If you click on it, it will take you to CNN's homepage.

Adding new RSS feeds

I'll use MacNify's RSS feed as an example of adding new feed to Safari.

  1. If you are on MacNify now (duh~), notice the "RSS" icon at the address bar? Unlike the previous one we saw, this one has a blue background. Safari 2.0 has a nice feature of auto-discovering the availability of RSS feed on the site that you are visiting. If RSS feed is found, this icon will appear. Clicking on it will open the feed in the browser.

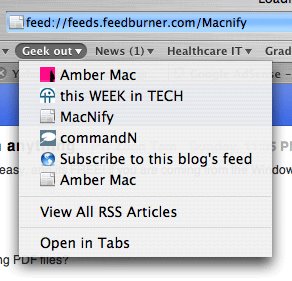
  2. It is important to note that clicking on the "RSS" icon does not automatically subscribe to the feed for you. To subscribe to a feed, you need to bookmark the feed URL. For example, I drag MacNify's feed URL to a group called "Geek Out" on the Bookmark Bar. That's basically all you need to do to "subscribe" to a feed.
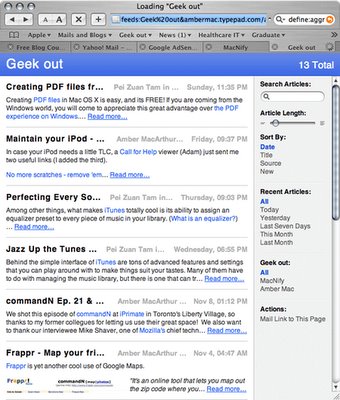
    Note: I also added a feed from Amber Mac to the same group. If I click the "View All RSS Articles" under the group's menu, RSS feeds from both MacNify and Amber Mac will be displayed together in a single page.

  3. One great thing about Safari's RSS implementation is the set of filtering options found in the sidebar at the right hand side of the RSS page. You can adjust the article length, sort them by different attributes, or search through thousands of RSS articles using the Search box.

Summary

In my opinion, Safari has one of the best browser-based implementation of RSS in town. The auto-discovery feature truly brings RSS from the geekosphere to the rest of us in the most Apple-ish way!

Yet another Mac tips is on the web!

Sunday, November 13, 2005

Creating PDF files from anything

Creating PDF files in Mac OS X is easy, and its FREE! If you are coming from the Windows world, you will come to appreciate this great advantage over the PDF experience on Windows.

Why PDF?

Why should you care about creating PDF files?

The reasons are plenty, but the most important one is document portability. By portability, it means more than just moving computer files around. PDF is meant for preserving the presentation (i.e. the formating) of a document across all platforms. It is a digital equivalence to the paper-printed documents: the content and the presentation of content remain consistent no mater who you pass it to. Because of this property, PDF is already the de facto standard for data exchanged in the internet age. Most government agencies and banks now provide downloadable application forms in PDF format. Universities and professional groups are also requiring research papers to be submitted in PDF format.

Other reasons include privacy protection by means of encryption and password protection, and many more. For more information about PDF, check out this cool website by Adobe, the print expert company that initiated the format.

A simple tutorial

Let's create a PDF file from a webpage.
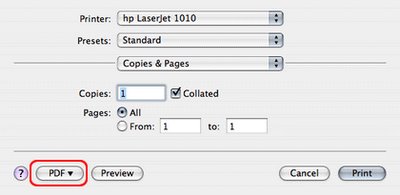
  1. In Safari, open the 'Print' dialog, then look for the 'PDF' button.

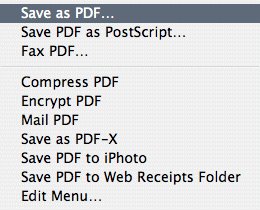
  2. Click the 'PDF' button to reveal the PDF options, then choose 'Save as PDF' (the organization of the options may vary in different versions of Mac OS X, it doesn't matter).

  3. Give a name to the PDF file and click Save. That's it!

Note: You can create PDF file from anything that can be printed with the pinter.. that's basically everything!

Screenshots of MacNify.PDF

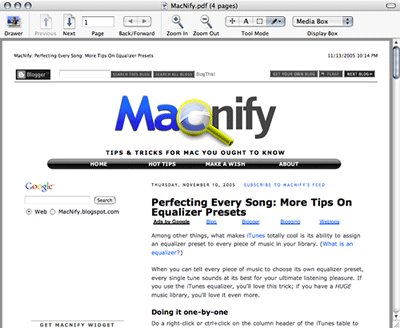
A PDF file named 'MacNify.pdf' is created.


Screenshot of MacNify.pdf.

Adobe Acrobat Professional

While Mac's support for PDF is impressive, it lacks the complete set of advanced functions found in Adobe's products. If you need to do more than just distributing documents, e.g. creating fillable forms, you may need Adobe Acrobat Professional (Amazon Link). Otherwise, save the bucks for your next iPod, Mac's support is good enough.

Thursday, November 10, 2005

Perfecting Every Song: More Tips On Equalizer Presets

Among other things, what makes iTunes totally cool is its ability to assign an equalizer preset to every piece of music in your library. (What is an equalizer?)

When you can tell every piece of music to choose its own equalizer preset, every single tune sounds at its best for your ultimate listening pleasure. If you use the iTunes equalizer, you'll love this trick; if you have a HUGE music library, you'll love it even more.

Doing it one-by-one

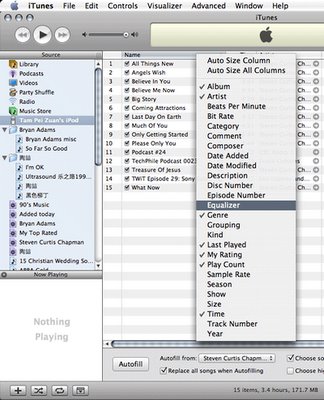
Do a right-click or ctrl+click on the column header of the iTunes table to reveal all the "song attributes" in a drop-down list. Check the 'Equalizer' in the list.
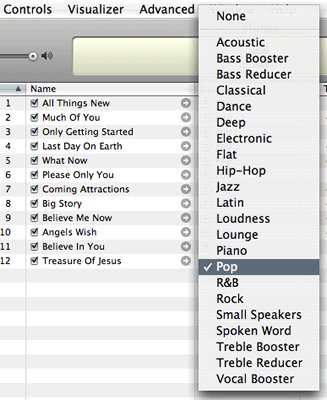
Now you will see a newly added column named Equalizer in the table. In each entry you can see a small button which looks like this. This button allows you to pull down the list of equalizer presets and choose one for that piece of song.

Doing it all at once

What if you have a genre album, and you just want to use the same equalizer preset for that particular set of songs? In this case you can do a batch change.

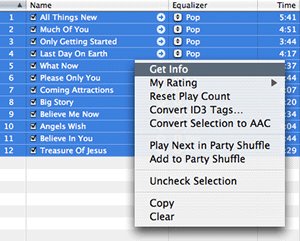
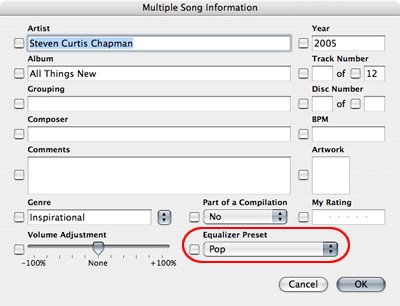
First, multiple-select the songs you want to change. Then right-click or ctrl+click the selected songs and choose 'Get Info' from the floating menu.
A new window containing all the batch-editable attributes of the selected songs will appear. Among other entries you might be interested in editing, the list of equalizer presets that you are looking for is sitting near the bottom-right corner. Choose an equalizer preset form the list, and the action will be propagated to all the selected songs.

Wednesday, November 09, 2005

Jazz Up the Tunes - Make Use of the Equalizer

Behind the simple interface of iTunes are tons of advanced features and settings that you can play around with to make things suit your tastes. Many of them have to do with managing the music library, but there is one that can truly make or break the music listening experience: the equalizer.

DJ-ing your way

Look for this button at the bottom-right corner of the iTunes window.

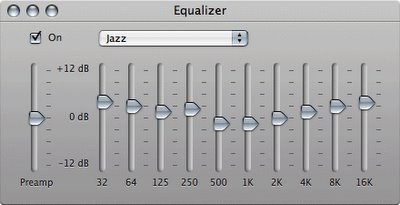
Clicking on this button will bring up the equalizer window. Check the 'On' box at the top-left corner to activate the equalizer. Reveal the drop-down list and you can see that iTunes is shipped with a good collection of equalizer settings called the presets.

Hear the difference

Let's start off by rolling a piece of your favorite music in iTunes. When the music is playing, try changing the equalizer to a few different presets. If you have not done this before, you'll be amazed at what a difference it could make with a proper setting of the equalizer.

Expanding the presets

Don't find any presets that satisfy your ear? Then make your own presets! First choose 'Manual' from the list, then adjust the slider of each frequency range until the music sounds right to you. To save the setting, choose "Make Preset..." from the preset list, give the new setting a name, and the new preset will be added to the list.

Getting the right equalizer setting for a piece of music is rather tricky. It requires a sensitive ear, a good taste, great patience, and some knowledge. Check out these cool sites for tutorials.

Managing the presets

To rename/remove a preset from the list, choose "Edit List..." from the preset list. A new window will appear and it is pretty much self-explanatory from there onwards, so we'll skip that part here.

Extra Tips

While you are playing around with the software audio equalizer, it is good to keep in mind that the final output of the music is depending on the types of speakers you are using with your Mac. Every single piece of speaker/earphone is engineered with a specific need in mind (or pure randomness due to poor engineering), therefore their performance at different frequency bands are not at all the same. The best (and a costly) way is to get a set of speakers that produces a wide range of frequency response and is at the same time unbiased towards a specific frequency range.

Yet another Mac tip is on the web!

Tuesday, November 08, 2005

MacNify Widget Explained

The purpose of the dashboard widget for this blog is really simple: to provide easy access directly from your desktop to the MacNify blog.

The idea is that since the widget is always on your dashboard or desktop, it serves as an effective tool to remind you of the latest posts on MacNify.

The MacNify Widget in a nutshell

The MacNify Widget covers the two primary functions that a blog-serving widget ought to provide:
  • To display the latest posts on the MacNify blog.

  • To perform simple search by keyword on the content of MacNify blog.

That's basically it! We Mac users just love simplicity, don't we?

The MacNify Widget anatomy

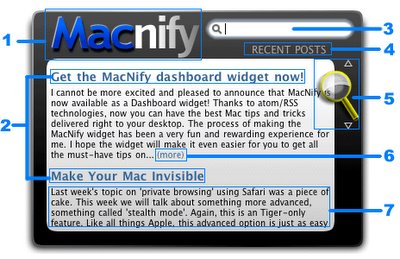
  1. Blog Title: Click to launch MacNify.blogspot.com in browser.

  2. Post Titles: Click to read the complete post in browser.

  3. Search Box: Allows you to do simple search within the MacNify website. To submit a search, type in keyword(s) and hit the 'enter' key. When left blank, the content area will display the recent posts on MacNify.

  4. Display Mode: Indicates whether the content area is displaying recent posts, or search results according the the keyword(s) in Search Box.

  5. Scrolling Glass: Drag up and down to scroll through the widget content area.

  6. (more): Click to open the webpage to read the entire post.

  7. Post Summary: A preview of the post content. Unlike the Post Title, the Post Summary does not respond to mouse-clicking events.

Saturday, November 05, 2005

MacNify Widget v1.1

Great news! The MacNify Widget version 1.1 has just been released!
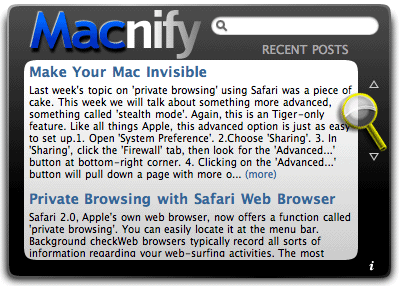
Screenshot of MacNify Widget

What's new?

  • Solved conflict with the Macmentor Widget.
  • Huge increase in download bandwidth.
  • More stable linkage to the blog page.

Note: version 1.0 is no longer available for download.

Upgrade now

Get your copy of the MacNify Widget version 1.1 here.

The demand for the widget has been so great for the pass one month that I have to buy some more bandwidth to meet the needs. Thanks to our dear reader Jb who recommended the great web hosting service, but the offer he mentioned was over so I did not buy the package. Sorry about that.

In case you have not yet noticed, the MacNify widget has been among the top 10 for about two weeks now on Apple's widget website! Thanks everyone who have downloaded the widget and enjoyed reading the blog. My apology to those who have not been able to download it due to the stinky bandwidth issue. I have been getting a lot of feedbacks through the email and you guys are just great! I'll continue to make MacNify the place to go for essential tips and tricks that enhance our mac-ing time in small but significant ways.


p/s: I have sent some "pre-release" copies of version 1.1 to some readers who requested the widget through email, but I recommend that everyone should get the official release copy.

Friday, November 04, 2005

Free Your Widgets From Dashboard (Part II)

The "Toggle Widget-On-Top" mini app is finally here!

Since we talked about putting dashboard widgets directly on the desktop, I promised there will be a Part II, which makes the mini app available. I, for one, have been waiting to see the promise fulfilled. The day has finally come, and it's TODAY!

Get the mini app

If you are hardcore about doing the UNIX command yourself, follow the instructions in Part I. Else, download the mini-app and be happy!

Click the icon to download the mini app.

Run the mini app

  1. If you are using Safari to download the mini app, it should automatically unzip and mount the disk image for you. Else, unzip it manually and double click the .dmg file to mount the disk image yourself.

  2. Once you get the the disk image mounted, the rest are just usual routines. You can either run the mini app directly, or copy it to your Application folder and run it from there.


Show me the Mm...magic!

You are good to go after running the mini app. Now let's do the trick!
  1. Launch dashboard by clicking the dashboard toggle key (e.g. F12, depending on your settings in Preference->'Dashboard & Exposé').

  2. Click on any widget and drag a little. Here's the catch: while dragging, hit the dashboard toggle key once. WHALAH! Now the widget is on your desktop, and it stays on top of all windows, all the time!
*repeating step 2 with the widgets on your desktop will bring them back to dashboard.

Show it off

With this trick you can now use your favorite widgets without even launching the Dashboard, and perhaps wow a few friends who don't read MacNify!

Yet another Mac tip is on the web!

Thursday, November 03, 2005

A Plethora of File-opening Methods

Click-a-click

The easiest way of opening a file from the Finder is to double-click it. The downside of this method is that it launches the default application, often times not the one you wish to use. For instance, you wish to use PhotoShop Elements to do some image editing, but double-clicking the image file may launch Preview instead.

You do ask for the Menu, don't you

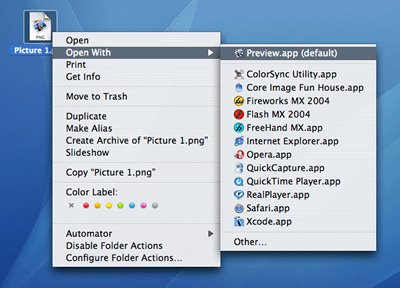
Another way is to ctrl+click on the file to pull down the floating menu, and choose your application of choice from the "Open With" submenu. I realize that the submenu may be a little slow at showing up especially when the file is supported by a large array of applications.

Drag 'n drop it!

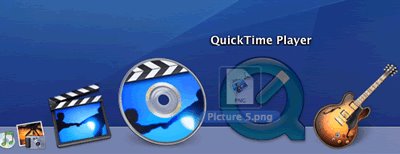
This is the no-nonsense method to open a file in a target application of your choice. Just click and drag the file over the application icon and release it, much like the way you drag and drop a file to the Trash. The application icon can be sitting on the Dock, on the desktop, or in the Finder; in each case, this method works just fine.

Although you may not need all three methods as often in your daily Mac-ing hours, I am sure there will be at least one that you find most convenient to work with. Hope this plethora of tricks will speed up your computing efficiency in a small but significant way.

Yet another Mac tip is on the web!