New year is just around the corner, soon we will se more enhancements on iPods, the rollout of Intel based Macs, and the launch of the next generation Mac OSX 'Leopard' from Apple. 2006 isn't going to get boring in the world of Apple. Hold your breathe!

Opinions
Tips & Tricks for Mac You Ought To Know
Saturday, December 24, 2005
Merry Christmas and Happy New Year to all Mac Users!
Thank you for the wonderful year of 2005. The exchange of Mac tips and ideas on this blog has been most fun for me, and I just hope that you have enjoyed it just as much!
New year is just around the corner, soon we will se more enhancements on iPods, the rollout of Intel based Macs, and the launch of the next generation Mac OSX 'Leopard' from Apple. 2006 isn't going to get boring in the world of Apple. Hold your breathe!
New year is just around the corner, soon we will se more enhancements on iPods, the rollout of Intel based Macs, and the launch of the next generation Mac OSX 'Leopard' from Apple. 2006 isn't going to get boring in the world of Apple. Hold your breathe!
Sunday, December 18, 2005
How to Add Album Artwork to iTunes
An album artwork is a little piece of picture that accompanies a piece of song in iTunes. You can think of it as the beautiful CD cover you used to get in those days when you still bought CDs.
Another instant when you get album artworks automatically is when you subscribe to podcasts on iTunes' podcast directory. Usually a podcast's album artwork is just the podcast's logo.
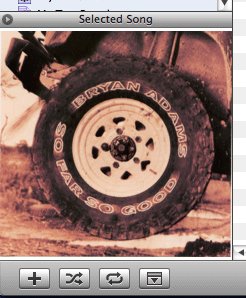
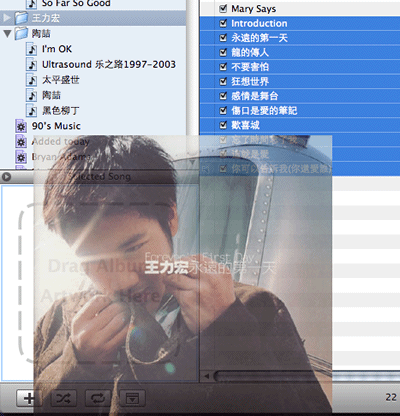
Adding a picture to a piece of music is easy. First make sure the album artwork window is set to display the "selected songs". Then, select a song in your library. Now if you have the CD cover scanned into a file, or you are able to find the CD cover from some website, you just need to drag and drop the file or the picture to the album artwork window.
Drag and drop a picture to the album artwork window.
Album artwork is added successfully.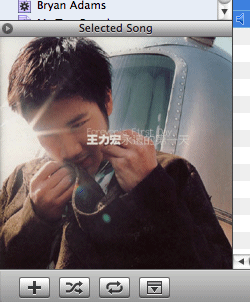
To add the same picture to a number of songs, e.g. all the songs of a single album, you can multiple-select the songs and repeat the same steps as mentioned.
When will you get Album Artwork automatically?
When you purchase the entire album from the iTunes music store, you will realize that a picture, the CD cover, is added to each of the songs as well.Another instant when you get album artworks automatically is when you subscribe to podcasts on iTunes' podcast directory. Usually a podcast's album artwork is just the podcast's logo.
How to add Album Artwork manually?
If you rip your own collection of CDs into iTunes, something all of us do, you have to find and add the album artwork yourself.Adding a picture to a piece of music is easy. First make sure the album artwork window is set to display the "selected songs". Then, select a song in your library. Now if you have the CD cover scanned into a file, or you are able to find the CD cover from some website, you just need to drag and drop the file or the picture to the album artwork window.
Drag and drop a picture to the album artwork window.
Album artwork is added successfully.

To add the same picture to a number of songs, e.g. all the songs of a single album, you can multiple-select the songs and repeat the same steps as mentioned.
Bring the Album Artwork with you on your iPods
Provided that your iPod has a color screen, or you own the ROKR, the album artworks will be transfer over as well when you sync your device with iTunes. No additional work is needed, just sync.Yet another Mac tip is on the web!
Wednesday, November 30, 2005
Filtering Spotlight Search in Finder
Since the launch of Mac OS 10.4 aka Tiger, Apple has replaced the "Search" box on Finder with Spotlight search.
 While it is much more convenient to access Spotlight at the menu bar, its straightforward style of searching often produce a bloated result that may not satisfy you. To do a filtered search, Finder would be a better place to go.

You can add multiple filters to a search result. For example, if you want to search for photos associated with "lake" that is taken within last two years using an Olympus camera, you can add the filters in the order of "Kind", "Created" and "Device make".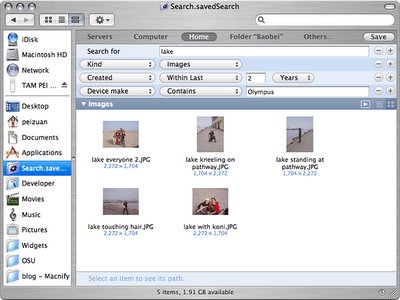
The work-around method is to always keep Smart folder at the Finder sidebar, and name it so something general, like "Search".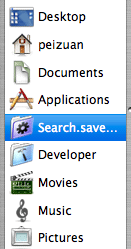
Whenever you want to set up filters before doing an actual search, you can open the general Smart Folder and the filters are already your service right away.
While it is much more convenient to access Spotlight at the menu bar, its straightforward style of searching often produce a bloated result that may not satisfy you. To do a filtered search, Finder would be a better place to go.Filtered Search
In Finder, type something in the Search box, and the Finder window will instantly switch to showing Spotlight search results. There is a "Save" button for you to save your search results to something called the Smart Folder, and a "+" button to add filtering options.
You can add multiple filters to a search result. For example, if you want to search for photos associated with "lake" that is taken within last two years using an Olympus camera, you can add the filters in the order of "Kind", "Created" and "Device make".

Smart use of "Smart Folder"
If I were to grudge about Spotlight in Finder, it would the arrangement whereby search filters are hidden from the user until the user starts punching stuff into the Search box.The work-around method is to always keep Smart folder at the Finder sidebar, and name it so something general, like "Search".

Whenever you want to set up filters before doing an actual search, you can open the general Smart Folder and the filters are already your service right away.
Yet another Mac tip is on the Web!
Wednesday, November 23, 2005
Happy Thanksgiving! Fun with the Weather Widget
Happy Thanksgiving to the MacNify readers in the USA!
It's a great weekend, so we shall have something not entire useful, but FUN! When your work on the computer gets dull, the weather widget may provide you some unexpected entertainment.
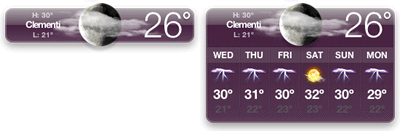
When you do a option+command+click, the weather location changes to 'Nowhere'. Every time you do this, the weather graphic changes to a different one. See if you can get what every graphic means!
When the fun is over and you want the weather widget to point back to your preset location, just select the weather widget and do a command+r to reload it.
It's a great weekend, so we shall have something not entire useful, but FUN! When your work on the computer gets dull, the weather widget may provide you some unexpected entertainment.
Slow-mo the weather man
We all know that clicking on the weather widget will reveal or retract the 6-day forecast. However, it is not popularly known that doing a shift+click will turn this action into a slow motion.
If only you can dictate the weather
Too bad we can't. No matter which corner of the globe you are at, you hardly get all types of weathers in one place, but you can still have fun looping through all the weather types that the weather widget knows.When you do a option+command+click, the weather location changes to 'Nowhere'. Every time you do this, the weather graphic changes to a different one. See if you can get what every graphic means!

When the fun is over and you want the weather widget to point back to your preset location, just select the weather widget and do a command+r to reload it.
Yet another Mac tip is on the web!
Saturday, November 19, 2005
Killing Dashboard Widgets the Jedi's Way
When you get bored of a widget (hopefully not the MacNify widget), you probably will want to get rid of it and free up some precious screen space.
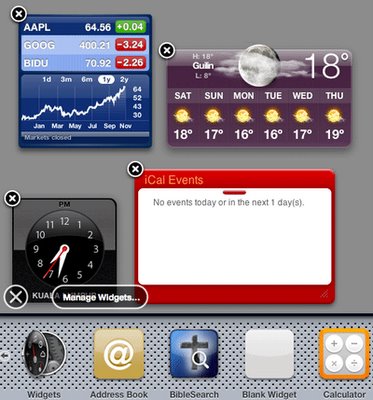
To close a widget, you click the little "x" button which can usually be found at the top-left corner of the widget. But first you will need to make those "x" buttons show up on screen, a move that can be very clumsy unless the force is with you.
Besides being the über cool way of closing a widget, this trick is the only way to close the widgets you have placed outside the dashboard.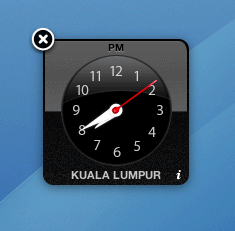
There I said it all. Now's your turn to translate this article into Yoda's grammar.
To close a widget, you click the little "x" button which can usually be found at the top-left corner of the widget. But first you will need to make those "x" buttons show up on screen, a move that can be very clumsy unless the force is with you.
The standard way
The standard way of closing a door is to walk to door and close it. The standard way of closing a widget is to pull out the widget panel, which also causes the "x" buttons of all the widgets to show up on screen, then click on the one that belongs to the widget you wish to close.
The Jedi's way
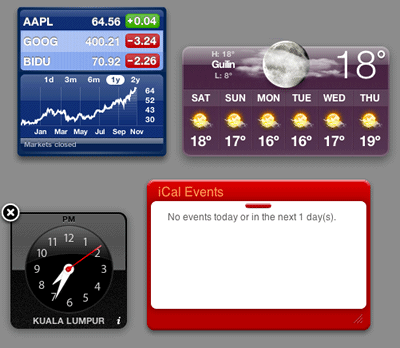
The jedi's way of closing the door is to remain at where you are and force-grib the door to close it. The jedi's way of closing a widget is to press-hold the option key and mouse-over the widget, a trick which reveals the "x" button of that widget alone, then click on the button and close the widget.
Besides being the über cool way of closing a widget, this trick is the only way to close the widgets you have placed outside the dashboard.

Go kill the Sith... I mean widgets
Your training is now over. Go to the Dashboard System at the outer rim and destroy as many widgets as you wish. May the force be with you.There I said it all. Now's your turn to translate this article into Yoda's grammar.
Yet another Mac tip is on the Web!
Tuesday, November 15, 2005
Instant RSS with Safari 2.0
RSS as news aggregator
The header of this paragraph basically says it all. Some big-time executives and politicians don't read news directly off the newspaper, website or TV. Rather, they have their news secretaries gather the news articles and format them nicely on clean pages. Taking the real-world analogy to the digital world, RSS (Really Simple Syndication) is the news secretary for you and me.RSS out-of-the-box
Even if you have not used RSS before, chances are that your Tiger is shipped with tons of feed together with Safari 2.0 (aka Safari RSS). First, open the bookmark page, and find your "All RSS Feeds" bookmark at the sidebar.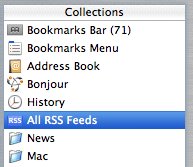
On the right hand side are all the RSS feeds that your Safari has subscribed to. Click on one of them to see what's inside. I choose the CNN feed, and up comes the news titles from CNN presented in a clean list. If you click on any news title, it will bring you right to the corresponding news article on CNN's website. Notice the blue-colored "RSS" at the right hand side of the address bar? If you click on it, it will take you to CNN's homepage.

Adding new RSS feeds
I'll use MacNify's RSS feed as an example of adding new feed to Safari.- If you are on MacNify now (duh~), notice the "RSS" icon at the address bar? Unlike the previous one we saw, this one has a blue background. Safari 2.0 has a nice feature of auto-discovering the availability of RSS feed on the site that you are visiting. If RSS feed is found, this icon will appear. Clicking on it will open the feed in the browser.

- It is important to note that clicking on the "RSS" icon does not automatically subscribe to the feed for you. To subscribe to a feed, you need to bookmark the feed URL. For example, I drag MacNify's feed URL to a group called "Geek Out" on the Bookmark Bar. That's basically all you need to do to "subscribe" to a feed.

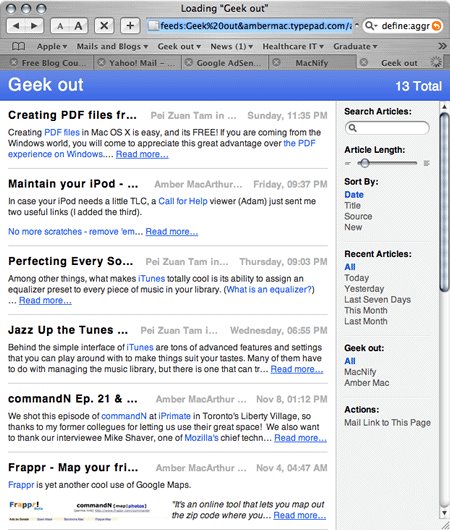
Note: I also added a feed from Amber Mac to the same group. If I click the "View All RSS Articles" under the group's menu, RSS feeds from both MacNify and Amber Mac will be displayed together in a single page.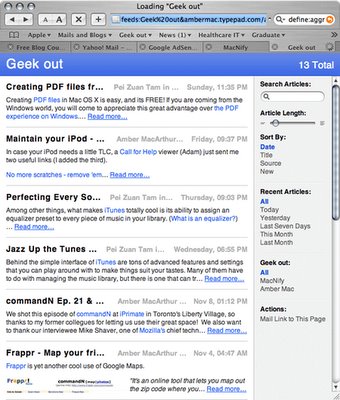
- One great thing about Safari's RSS implementation is the set of filtering options found in the sidebar at the right hand side of the RSS page. You can adjust the article length, sort them by different attributes, or search through thousands of RSS articles using the Search box.


Summary
In my opinion, Safari has one of the best browser-based implementation of RSS in town. The auto-discovery feature truly brings RSS from the geekosphere to the rest of us in the most Apple-ish way!Yet another Mac tips is on the web!
Sunday, November 13, 2005
Creating PDF files from anything
Creating PDF files in Mac OS X is easy, and its FREE! If you are coming from the Windows world, you will come to appreciate this great advantage over the PDF experience on Windows.
The reasons are plenty, but the most important one is document portability. By portability, it means more than just moving computer files around. PDF is meant for preserving the presentation (i.e. the formating) of a document across all platforms. It is a digital equivalence to the paper-printed documents: the content and the presentation of content remain consistent no mater who you pass it to. Because of this property, PDF is already the de facto standard for data exchanged in the internet age. Most government agencies and banks now provide downloadable application forms in PDF format. Universities and professional groups are also requiring research papers to be submitted in PDF format.
Other reasons include privacy protection by means of encryption and password protection, and many more. For more information about PDF, check out this cool website by Adobe, the print expert company that initiated the format.
Note: You can create PDF file from anything that can be printed with the pinter.. that's basically everything!

Screenshot of MacNify.pdf.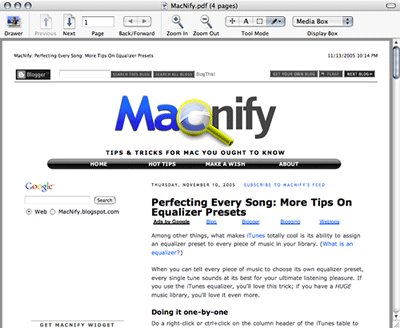
 . Otherwise, save the bucks for your next iPod, Mac's support is good enough.
Why PDF?
Why should you care about creating PDF files?The reasons are plenty, but the most important one is document portability. By portability, it means more than just moving computer files around. PDF is meant for preserving the presentation (i.e. the formating) of a document across all platforms. It is a digital equivalence to the paper-printed documents: the content and the presentation of content remain consistent no mater who you pass it to. Because of this property, PDF is already the de facto standard for data exchanged in the internet age. Most government agencies and banks now provide downloadable application forms in PDF format. Universities and professional groups are also requiring research papers to be submitted in PDF format.
Other reasons include privacy protection by means of encryption and password protection, and many more. For more information about PDF, check out this cool website by Adobe, the print expert company that initiated the format.
A simple tutorial
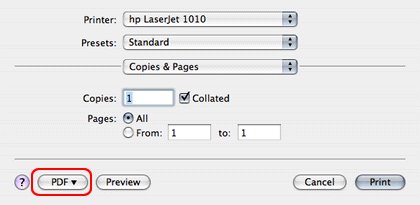
Let's create a PDF file from a webpage.- In Safari, open the 'Print' dialog, then look for the 'PDF' button.
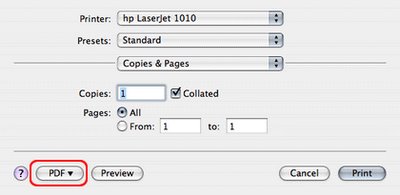
- Click the 'PDF' button to reveal the PDF options, then choose 'Save as PDF' (the organization of the options may vary in different versions of Mac OS X, it doesn't matter).
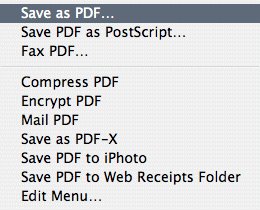
- Give a name to the PDF file and click Save. That's it!

Note: You can create PDF file from anything that can be printed with the pinter.. that's basically everything!
Screenshots of MacNify.PDF
A PDF file named 'MacNify.pdf' is created.
Screenshot of MacNify.pdf.

Adobe Acrobat Professional
While Mac's support for PDF is impressive, it lacks the complete set of advanced functions found in Adobe's products. If you need to do more than just distributing documents, e.g. creating fillable forms, you may need Adobe Acrobat Professional (Amazon Link)Thursday, November 10, 2005
Perfecting Every Song: More Tips On Equalizer Presets
Among other things, what makes iTunes totally cool is its ability to assign an equalizer preset to every piece of music in your library. (What is an equalizer?)
When you can tell every piece of music to choose its own equalizer preset, every single tune sounds at its best for your ultimate listening pleasure. If you use the iTunes equalizer, you'll love this trick; if you have a HUGE music library, you'll love it even more.
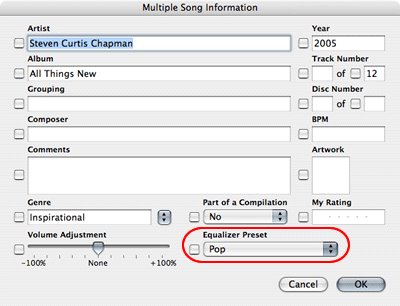
Now you will see a newly added column named Equalizer in the table. In each entry you can see a small button which looks like this . This button allows you to pull down the list of equalizer presets and choose one for that piece of song.
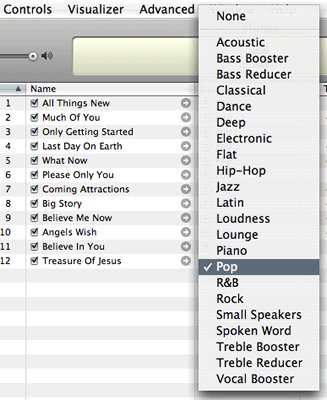
First, multiple-select the songs you want to change. Then right-click or ctrl+click the selected songs and choose 'Get Info' from the floating menu.
A new window containing all the batch-editable attributes of the selected songs will appear. Among other entries you might be interested in editing, the list of equalizer presets that you are looking for is sitting near the bottom-right corner. Choose an equalizer preset form the list, and the action will be propagated to all the selected songs.
When you can tell every piece of music to choose its own equalizer preset, every single tune sounds at its best for your ultimate listening pleasure. If you use the iTunes equalizer, you'll love this trick; if you have a HUGE music library, you'll love it even more.
Doing it one-by-one
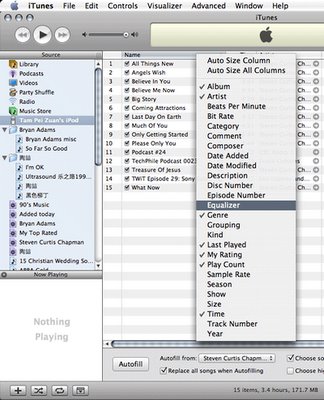
Do a right-click or ctrl+click on the column header of the iTunes table to reveal all the "song attributes" in a drop-down list. Check the 'Equalizer' in the list.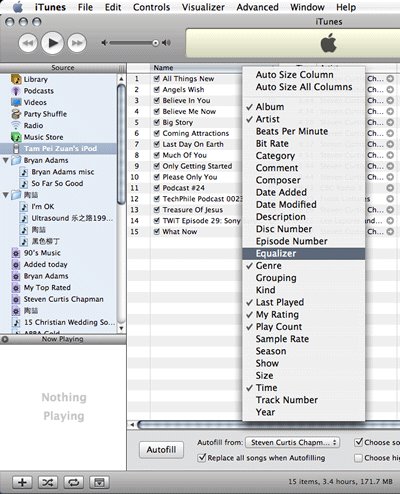
Now you will see a newly added column named Equalizer in the table. In each entry you can see a small button which looks like this
 . This button allows you to pull down the list of equalizer presets and choose one for that piece of song.
Doing it all at once
What if you have a genre album, and you just want to use the same equalizer preset for that particular set of songs? In this case you can do a batch change.First, multiple-select the songs you want to change. Then right-click or ctrl+click the selected songs and choose 'Get Info' from the floating menu.
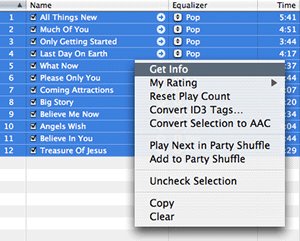
A new window containing all the batch-editable attributes of the selected songs will appear. Among other entries you might be interested in editing, the list of equalizer presets that you are looking for is sitting near the bottom-right corner. Choose an equalizer preset form the list, and the action will be propagated to all the selected songs.
Wednesday, November 09, 2005
Jazz Up the Tunes - Make Use of the Equalizer
Behind the simple interface of iTunes are tons of advanced features and settings that you can play around with to make things suit your tastes. Many of them have to do with managing the music library, but there is one that can truly make or break the music listening experience: the equalizer.
 at the bottom-right corner of the iTunes window.
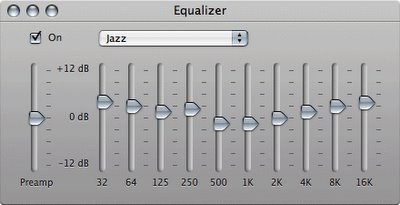
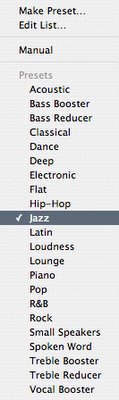
Clicking on this button will bring up the equalizer window. Check the 'On' box at the top-left corner to activate the equalizer. Reveal the drop-down list and you can see that iTunes is shipped with a good collection of equalizer settings called the presets.
Getting the right equalizer setting for a piece of music is rather tricky. It requires a sensitive ear, a good taste, great patience, and some knowledge. Check out these cool sites for tutorials.
DJ-ing your way
Look for this button at the bottom-right corner of the iTunes window.

Clicking on this button will bring up the equalizer window. Check the 'On' box at the top-left corner to activate the equalizer. Reveal the drop-down list and you can see that iTunes is shipped with a good collection of equalizer settings called the presets.
Hear the difference
Let's start off by rolling a piece of your favorite music in iTunes. When the music is playing, try changing the equalizer to a few different presets. If you have not done this before, you'll be amazed at what a difference it could make with a proper setting of the equalizer.Expanding the presets
Don't find any presets that satisfy your ear? Then make your own presets! First choose 'Manual' from the list, then adjust the slider of each frequency range until the music sounds right to you. To save the setting, choose "Make Preset..." from the preset list, give the new setting a name, and the new preset will be added to the list.Getting the right equalizer setting for a piece of music is rather tricky. It requires a sensitive ear, a good taste, great patience, and some knowledge. Check out these cool sites for tutorials.
- Drew's Equalizer And Frequency Equalization Tutorial
- Equalization filter on Wikipedia. (Warning: level-10 geekiness!)
Managing the presets
To rename/remove a preset from the list, choose "Edit List..." from the preset list. A new window will appear and it is pretty much self-explanatory from there onwards, so we'll skip that part here.Extra Tips
While you are playing around with the software audio equalizer, it is good to keep in mind that the final output of the music is depending on the types of speakers you are using with your Mac. Every single piece of speaker/earphone is engineered with a specific need in mind (or pure randomness due to poor engineering), therefore their performance at different frequency bands are not at all the same. The best (and a costly) way is to get a set of speakers that produces a wide range of frequency response and is at the same time unbiased towards a specific frequency range.Yet another Mac tip is on the web!
Tuesday, November 08, 2005
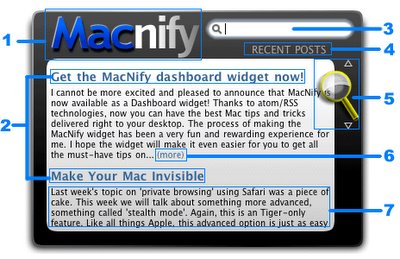
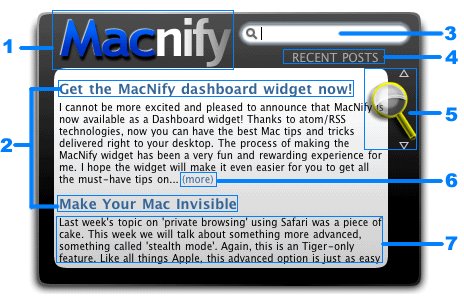
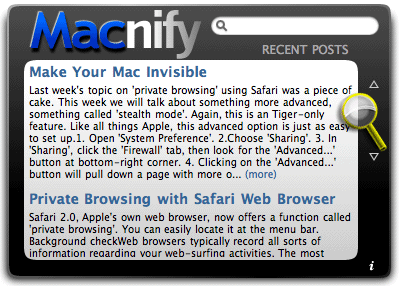
MacNify Widget Explained
The purpose of the dashboard widget for this blog is really simple: to provide easy access directly from your desktop to the MacNify blog.
The idea is that since the widget is always on your dashboard or desktop, it serves as an effective tool to remind you of the latest posts on MacNify.
The idea is that since the widget is always on your dashboard or desktop, it serves as an effective tool to remind you of the latest posts on MacNify.
The MacNify Widget in a nutshell
The MacNify Widget covers the two primary functions that a blog-serving widget ought to provide:- To display the latest posts on the MacNify blog.
- To perform simple search by keyword on the content of MacNify blog.
The MacNify Widget anatomy
- Blog Title: Click to launch MacNify.blogspot.com in browser.
- Post Titles: Click to read the complete post in browser.
- Search Box: Allows you to do simple search within the MacNify website. To submit a search, type in keyword(s) and hit the 'enter' key. When left blank, the content area will display the recent posts on MacNify.
- Display Mode: Indicates whether the content area is displaying recent posts, or search results according the the keyword(s) in Search Box.
- Scrolling Glass: Drag up and down to scroll through the widget content area.
- (more): Click to open the webpage to read the entire post.
- Post Summary: A preview of the post content. Unlike the Post Title, the Post Summary does not respond to mouse-clicking events.
Saturday, November 05, 2005
MacNify Widget v1.1
Great news! The MacNify Widget version 1.1 has just been released!
The demand for the widget has been so great for the pass one month that I have to buy some more bandwidth to meet the needs. Thanks to our dear reader Jb who recommended the great web hosting service, but the offer he mentioned was over so I did not buy the package. Sorry about that.
In case you have not yet noticed, the MacNify widget has been among the top 10 for about two weeks now on Apple's widget website! Thanks everyone who have downloaded the widget and enjoyed reading the blog. My apology to those who have not been able to download it due to the stinky bandwidth issue. I have been getting a lot of feedbacks through the email and you guys are just great! I'll continue to make MacNify the place to go for essential tips and tricks that enhance our mac-ing time in small but significant ways.
p/s: I have sent some "pre-release" copies of version 1.1 to some readers who requested the widget through email, but I recommend that everyone should get the official release copy.
What's new?
- Solved conflict with the Macmentor Widget.
- Huge increase in download bandwidth.
- More stable linkage to the blog page.
Upgrade now
Get your copy of the MacNify Widget version 1.1 here.The demand for the widget has been so great for the pass one month that I have to buy some more bandwidth to meet the needs. Thanks to our dear reader Jb who recommended the great web hosting service, but the offer he mentioned was over so I did not buy the package. Sorry about that.
In case you have not yet noticed, the MacNify widget has been among the top 10 for about two weeks now on Apple's widget website! Thanks everyone who have downloaded the widget and enjoyed reading the blog. My apology to those who have not been able to download it due to the stinky bandwidth issue. I have been getting a lot of feedbacks through the email and you guys are just great! I'll continue to make MacNify the place to go for essential tips and tricks that enhance our mac-ing time in small but significant ways.
p/s: I have sent some "pre-release" copies of version 1.1 to some readers who requested the widget through email, but I recommend that everyone should get the official release copy.
Friday, November 04, 2005
Free Your Widgets From Dashboard (Part II)
The "Toggle Widget-On-Top" mini app is finally here!
Since we talked about putting dashboard widgets directly on the desktop, I promised there will be a Part II, which makes the mini app available. I, for one, have been waiting to see the promise fulfilled. The day has finally come, and it's TODAY!Get the mini app
If you are hardcore about doing the UNIX command yourself, follow the instructions in Part I. Else, download the mini-app and be happy!Click the icon to download the mini app.
Run the mini app
- If you are using Safari to download the mini app, it should automatically unzip and mount the disk image for you. Else, unzip it manually and double click the .dmg file to mount the disk image yourself.
- Once you get the the disk image mounted, the rest are just usual routines. You can either run the mini app directly, or copy it to your Application folder and run it from there.
Show me the Mm...magic!
You are good to go after running the mini app. Now let's do the trick!- Launch dashboard by clicking the dashboard toggle key (e.g. F12, depending on your settings in Preference->'Dashboard & Exposé').
- Click on any widget and drag a little. Here's the catch: while dragging, hit the dashboard toggle key once. WHALAH! Now the widget is on your desktop, and it stays on top of all windows, all the time!
Show it off
With this trick you can now use your favorite widgets without even launching the Dashboard, and perhaps wow a few friends who don't read MacNify!Yet another Mac tip is on the web!
Thursday, November 03, 2005
A Plethora of File-opening Methods
Click-a-click
The easiest way of opening a file from the Finder is to double-click it. The downside of this method is that it launches the default application, often times not the one you wish to use. For instance, you wish to use PhotoShop ElementsYou do ask for the Menu, don't you
Another way is to ctrl+click on the file to pull down the floating menu, and choose your application of choice from the "Open With" submenu. I realize that the submenu may be a little slow at showing up especially when the file is supported by a large array of applications.
Drag 'n drop it!
This is the no-nonsense method to open a file in a target application of your choice. Just click and drag the file over the application icon and release it, much like the way you drag and drop a file to the Trash. The application icon can be sitting on the Dock, on the desktop, or in the Finder; in each case, this method works just fine.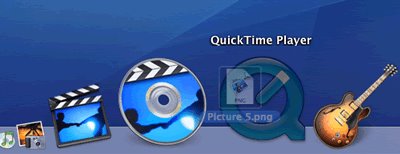
Although you may not need all three methods as often in your daily Mac-ing hours, I am sure there will be at least one that you find most convenient to work with. Hope this plethora of tricks will speed up your computing efficiency in a small but significant way.
Yet another Mac tip is on the web!
Sunday, October 30, 2005
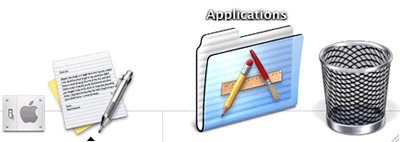
Put A "Start Button" On Dock
But we don't want a "Start" Button!
Ok, there isn't really a "Start Button" like the one on Microsoft Windows, and I doubt there will ever be one from Apple. But what you are going to see is almost the same in terms of its usefulness and behavior.As easy as drag-n-drop
- Drag the 'Application' folder in your root directory to the Dock, and place it somewhere at the right hand side of the divider (where the Trash is). Be cautioned NOT to drag the "Application" from the sidebar. The one on the sidebar is itself an alias, hence doing so will move it over the dock instead of creating a new one.
- An alias of the folder is created on the Dock instantly.

Show all applications in a nested list
Do a right-click or ctrl-click on the folder alias, and you'll see a list of all the applications in the 'Application' folder. It works just like the "Start" button on Windows!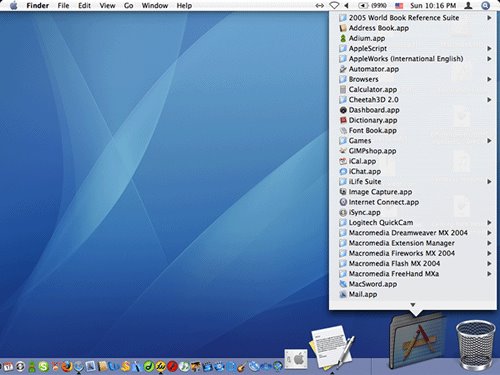 It can even show the contents of the subfolders in a nested list, much like the "Start" menu on Windows.
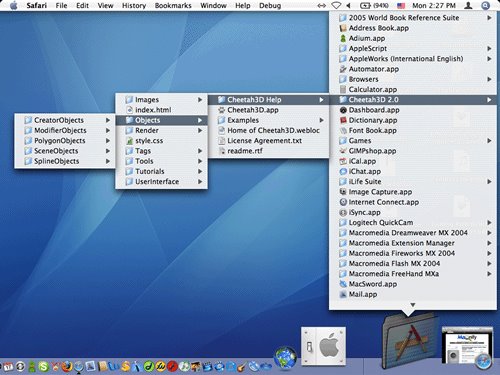
Remove the folder alias
If you don't like the idea of putting a folder alias on the Dock, removing it is just as simple. Just drag the folder alias out of the Dock and release the mouse button and it's gone. That's it!Apply the trick to any folder
The trick works with all folders. What I love about this trick is that it allows you to access the folders and their contents that you need most often without having to dig through layers of opened windows to... err... find the Finder. However, if the alias you make belongs to a Smart Folder, you cannot list the content as mention above; you can only do a normal click and launch the target folder in a new window.Yet another Mac tip is on the web!
Friday, October 28, 2005
Field Trip @ Apple Store: iPod's Video Function Tested
iPod's video function tested!
Since the launch of the new iPod about two weeks ago, I have wondered whether videos would look good on the tiny screen. Last Sunday I finally got a chance to play with it at the Apple store.Size matters
Your digital cameras might be one of the latest modals that come with 2.5" LCD screens, so you may very well know how it is like when running videos on the iPod. In fact, 2.5" is quite big for a portable device that fits into your pocket. The size of the screen is great for casual moments like sharing kid's birthday videos or the latest greatest music videos with friends, but still a far cry from serious movie treats with home-popped popcorns.iPod + TV
What if you can hook it up to a TV set and play Finding NemoI asked the same Apple guy whether the iPod could handle videos in various sizes and adjust them dynamically to fit the 2.5" screen, and the answer was No. It turns out that iPod can only handle videos up to 320 x 240 pixels, which is the native resolution of the screen itself (that's half the TV's resolution, but TV does interlaced frames, so I think it doesn't matter). That isn't very impressive in the age of high-resolution content. However it is still okay to play video on TV with the iPod as long as you are not looking for a cinematic experience. Steve Jobs, Apple's CEO, demonstrated that at the product launch using a footage from U2's live concert and it worked reasonably well.
The bottom line is, there is no HD support yet with this release. Perhaps when Apple finally rolls out the true iPod Video, there will be. Let's keep hoping.
Do we like it?
Still, there are things to like about the iPod's video function. Videos run smooth on it, and the LCD delivers sharp images and dynamic colors. Although it may take a few seconds to load the video (buffering, as they call it), once the video starts rolling it will play without skips and delays (unless you have a corrupted file).And let's not forget that with the new iPod you can now put tons of video content in your pocket and play it on the device itself as well as standard TV sets and projectors. I am sure all of us can think of ways to capitalize on this new freedom. For example, some people are already using the iPod Photo to do slides presentation, now with the new iPod they get to do video presentation as well.
Should you buy it?
If you have craved for the big iPod all these while, by all means get one of these new iPod! With or without video it doesn't make the iPod a less exciting portable music player than it already is. Plus video? Why not!? All in all, the new iPod makes a very good video device on the road. I'd want to use this gadget to watch video podcasts and comedies, but definitely not Star Wars.Thursday, October 27, 2005
Emergency Notice About MacNify Widget
The MacNify widget was built using the one by Macmentor.org as a template. Macmentor.org is a wonderful site that is dedicated to new Mac users coming from Windows (aka switchers).
The founder of Macmentor.org just contacted me that the MacNify widget actually erases the Macmentor widget if you have both of them running on Dashboard. This is my bad! I realized that I duplicated the info.plist file and left an entry unchanged, which caused the problem. My sincere apology to the people at Macmentor. You have enabled me in such a great way and I feel all the more ashamed of this mistake.
To the MacNify widget users, I am taking this opportunity to show some simple steps to correct the MacNify widget from this nasty behavior. A newer MacNify widget that does away with this problem is on the way, but it will take about two weeks to be available. So please follow the simple steps to make changes for good.
This will solve the widget conflict issue.
The founder of Macmentor.org just contacted me that the MacNify widget actually erases the Macmentor widget if you have both of them running on Dashboard. This is my bad! I realized that I duplicated the info.plist file and left an entry unchanged, which caused the problem. My sincere apology to the people at Macmentor. You have enabled me in such a great way and I feel all the more ashamed of this mistake.
To the MacNify widget users, I am taking this opportunity to show some simple steps to correct the MacNify widget from this nasty behavior. A newer MacNify widget that does away with this problem is on the way, but it will take about two weeks to be available. So please follow the simple steps to make changes for good.
- Look for where the MacNify widget is stored on your harddisk. It should be found at HOME(i.e. your account)->Library->Widgets. Or you can use Spotlight to locate it.
- Right-click or command-click on MacNify.wdgt and choose "Show Package Contents".

- A new window will pop up the screen. Open the file info.plist by double clicking it.
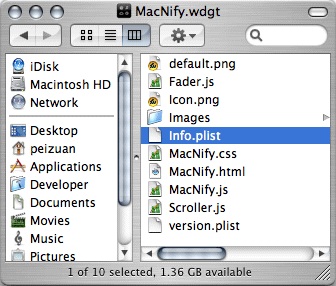
- In the info.plist file, locate the entry CFBundleIdentifier and change the value to com.apple.widget.macnify

- Save and close info.plist, as well as the window that shows the package contents.
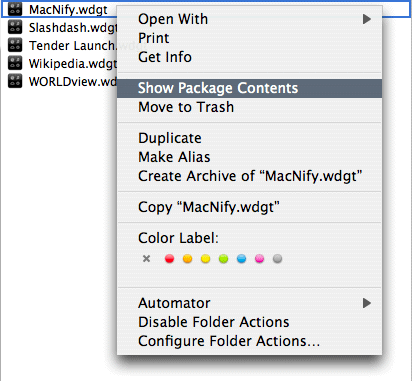

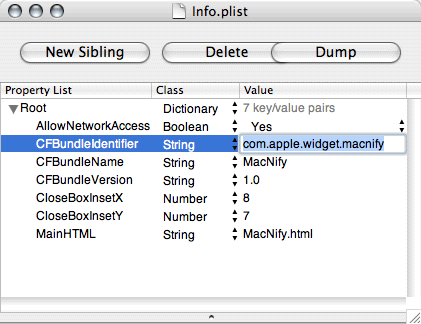
This will solve the widget conflict issue.
Tuesday, October 25, 2005
Updated Tips On Dashboard Tricks
Hope you have been having fun with flipping widgets in and out of dashboard.
There's a newly added command as well as the updated mini app with the trick. Basically it's about how to complete the trick without having to log-out and log-in for changes to take effect. Go check it out!
This is how the mini app's icon looks like.
p/s: the mini app is finally uploaded and ready for download.
There's a newly added command as well as the updated mini app with the trick. Basically it's about how to complete the trick without having to log-out and log-in for changes to take effect. Go check it out!
 This is how the mini app's icon looks like.
p/s: the mini app is finally uploaded and ready for download.
Sunday, October 23, 2005
The Mac Dating Tips
I'm not kidding. I was out today for a treasure hunting at the Apple store, and guess what I found? Apple fanboys seriously need dating tips.
I strolled to the new iPod for some hands-on experience with the video functionality before I could do a review on MacNify. Then there came this couple standing next to me checking out the same iPod. I couldn't help overhearing the guy saying, "just look at that, it is so cool and advanced. How could anyone not fall for it?". The girl, evidently clueless about what the iPod Video was all about, went "really?". So the guy repeated, "just look at that....(blah blah blah)", only with more efforts and zeal.
Okay, I get your point. But... come one, dude, you sound more like begging for permission to spend the bucks on the toy for yourself. Wanna impress her? Then shut up and buy one for her! My friend did that, I did that, and it worked!
Seriously, if iPod is so good that it's almost a sin to not let your loved one enjoy, then the best way to make her fall for it is to get her one. Her friends will be jealous of her, for both the iPod and the boyfriend.
I strolled to the new iPod for some hands-on experience with the video functionality before I could do a review on MacNify. Then there came this couple standing next to me checking out the same iPod. I couldn't help overhearing the guy saying, "just look at that, it is so cool and advanced. How could anyone not fall for it?". The girl, evidently clueless about what the iPod Video was all about, went "really?". So the guy repeated, "just look at that....(blah blah blah)", only with more efforts and zeal.
Okay, I get your point. But... come one, dude, you sound more like begging for permission to spend the bucks on the toy for yourself. Wanna impress her? Then shut up and buy one for her! My friend did that, I did that, and it worked!

Seriously, if iPod is so good that it's almost a sin to not let your loved one enjoy, then the best way to make her fall for it is to get her one. Her friends will be jealous of her, for both the iPod and the boyfriend.
Friday, October 21, 2005
Watch Podcasts?
Sure!
Podcast isn't just about web radio anymore. Technically speaking, the tricks that make audio podcasts tick apply to video contents too!
The video podcast that I watch is commandn, a weekly soft tech program hosted by Amber MacArthur and Mike Lazazzera. It is available on many podcast services. The best places to get it would be the podcast section on iTunes music store, Yahoo Podcasts, and of course the hosts' personal websites.
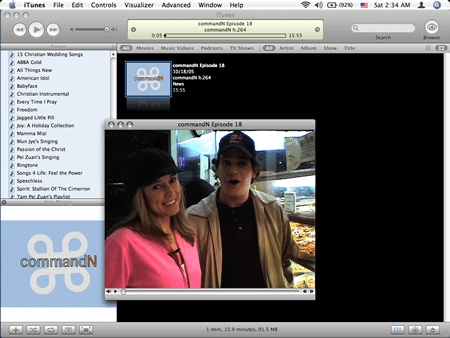 Watching commandn directly on iTunes.
Podcast isn't just about web radio anymore. Technically speaking, the tricks that make audio podcasts tick apply to video contents too!
The video podcast that I watch is commandn, a weekly soft tech program hosted by Amber MacArthur and Mike Lazazzera. It is available on many podcast services. The best places to get it would be the podcast section on iTunes music store, Yahoo Podcasts, and of course the hosts' personal websites.
A ticket to Geek's Club...ok, maybe not
Sometimes tech news is useful even if you are not a geek and don't wish to be one. The knowledge may enable you to decide better when to buy your next tech toy, or whether to buy it at all! You don't have to go for tech enthusiast's type of thing, like TWIT aka This Week In Tech (one of my favorite podcasts too). On the other hand, soft tech news is fun, especially when it comes in video! That's where commandn fits in.Watching commandn directly on iTunes.Yet another Mac tip is on the web!
Tuesday, October 18, 2005
Best iPod+iTunes TV Ad, Ever!
iPod+iTunes TV ads have always been like nothing else we've seen on TV.
Just like what Steve Jobs loves to say, the best just got better. Fill in the blank. In this case, it's "Ad".
The new iPod+iTunes TV ads features Eminem. Go check it out!


Just like what Steve Jobs loves to say, the best just got better. Fill in the blank. In this case, it's "Ad".
The new iPod+iTunes TV ads features Eminem. Go check it out!
Some Screenshots


Yet another Mac tip is on the web!
Free Your Widgets From Dashboard (Part I)
How about placing your favorite widgets on your desktop?
With the launch of MacNify Widget, I'd love to unveil what is possibly the best trick on Dashboard.
 You can use widgets outside dashboard too!
p/s: the mini app is finally uploaded and ready for download.
With the launch of MacNify Widget, I'd love to unveil what is possibly the best trick on Dashboard.
 You can use widgets outside dashboard too!
Do Yourself Some UNIX Commands
- Fire up Terminal, and run the command: defaults write com.apple.dashboard devmode YES
- To verify the changes, run defaults read com.apple.dashboard devmode. It should return you a YES, which means that dashboard is running in development mode.
- Lastly, run killall Dock. This will kill the Dock...duh! But Mac will immediately start a new one and reload your dashboard as well.
If There is Part I, There Must Be Part II
Just in case you find the UNIX commands too daunting, I have created a mini application to do just that for you. But you see, my current download bandwidth is all taken up by the MacNify Widget. Many readers have not been able to download the widget and I know it sucks. Therefore I really am not going to put more things there just to disappoint you. I'll leave the direct download of the mini app to Part II of this topic, when I finally find a host with generous bandwidth. Meanwhile, if you are keen on trying out the mini app, you can place a request at macnify@yahoo.com and I will send it to you. You are encouraged to share it with friends too!Show me the Mm...magic!
After running the UNIX command or the mini app, you are good to go. Let's do the trick!- Launch dashboard by clicking the dashboard toggle key (e.g. F12, depending on your settings in Preference->'Dashboard & Exposé').
- Click on any widget and drag a little. Here's the catch: while dragging, hit the dashboard toggle key once. WHALAH! Now the widget is on your desktop, and it stays on top of all windows, all the time!
Show it off
With this trick you can now use your favorite widgets without even launching the Dashboard, and perhaps wow a few friends who don't read MacNify!p/s: the mini app is finally uploaded and ready for download.
Yet another Mac tip is on the web!
Thursday, October 13, 2005
iPod With Video Feature
No Kidding!
Earlier on Apple sent out invitations to the presses and media, with nothing but one phrase printed on the card: One More Thing.
So what is it? Video, that's the thing. But if we zoom in a little, there weren't just one more thing, but a few more.
There was the new iPod that plays video (finally!), and there was the new iMac G5 that doubles as media center with remote (think TV)! We will talk on the new iPod this time.
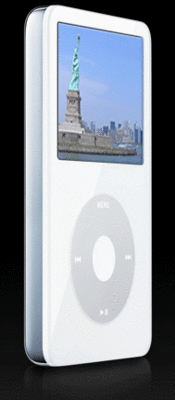 All of us will conveniently call it that way, although Apple seems to play down the idea of iPod Video even with the video capability added. Point to note: there is no official name as "iPod Video" whatsoever, just iPod. In a way, that's logical. Just like how iPod Nano completely replaced the iPod Mini, the so called iPod Video now completely replaced the original granddaddy iPod. In other words, video has become the standard function on iPod. So if you go for a full-size iPod from today onwards, you get to play video!
Some journalists, like Leo Laporte of TWIT, didn't believe Apple would do an iPod with video so soon given that they just released iPod Nano not long ago. But Apple did it anyway. It just goes on showing how distinct these two products and their target markets are that cannibalization isn't a concern that bothers Apple. In fact, Apple has to do it in order to create a product lineup with clear differentiations across the iPod familly.
The one important thing is, iPod with video is finally here! Rumor no more, deal with the fact, iPod wannabes!
Earlier on Apple sent out invitations to the presses and media, with nothing but one phrase printed on the card: One More Thing.
So what is it? Video, that's the thing. But if we zoom in a little, there weren't just one more thing, but a few more.
There was the new iPod that plays video (finally!), and there was the new iMac G5 that doubles as media center with remote (think TV)! We will talk on the new iPod this time.
iPod Video...?(See for yourself)
 All of us will conveniently call it that way, although Apple seems to play down the idea of iPod Video even with the video capability added. Point to note: there is no official name as "iPod Video" whatsoever, just iPod. In a way, that's logical. Just like how iPod Nano completely replaced the iPod Mini, the so called iPod Video now completely replaced the original granddaddy iPod. In other words, video has become the standard function on iPod. So if you go for a full-size iPod from today onwards, you get to play video!
Some journalists, like Leo Laporte of TWIT, didn't believe Apple would do an iPod with video so soon given that they just released iPod Nano not long ago. But Apple did it anyway. It just goes on showing how distinct these two products and their target markets are that cannibalization isn't a concern that bothers Apple. In fact, Apple has to do it in order to create a product lineup with clear differentiations across the iPod familly.
Checklist
So it plays video alright, are there more to watch out for? Sure there are. First, it's thinner, 45% thinner than the previous full-size iPod. Than there's a longer battery life: the 30GB model plays audio for 14 hours, the 60GB one 20 hours. There are a few more interesting findings, like the mentioning of audio recording and video-out to TV in the spec list.MacNify's take
It's too soon for a hands-on test even for MacNify at this moment, so there are no final words yet. It would be great if it plays HD video directly on TV through the AV cable. After all the screen on iPod is too small. As soon as it hits the local Apple store, I'm going to check it out!The one important thing is, iPod with video is finally here! Rumor no more, deal with the fact, iPod wannabes!
Yet another Mac tip is on the web!
Subscribe to:
Posts (Atom)