Tuesday, November 08, 2005

MacNify Widget Explained

The purpose of the dashboard widget for this blog is really simple: to provide easy access directly from your desktop to the MacNify blog.

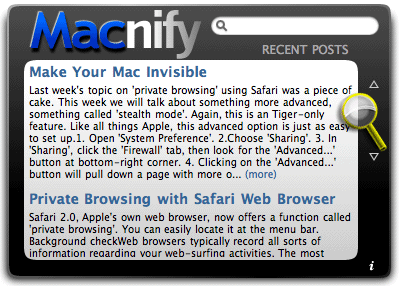
The idea is that since the widget is always on your dashboard or desktop, it serves as an effective tool to remind you of the latest posts on MacNify.

The MacNify Widget in a nutshell

The MacNify Widget covers the two primary functions that a blog-serving widget ought to provide:
  • To display the latest posts on the MacNify blog.

  • To perform simple search by keyword on the content of MacNify blog.

That's basically it! We Mac users just love simplicity, don't we?

The MacNify Widget anatomy

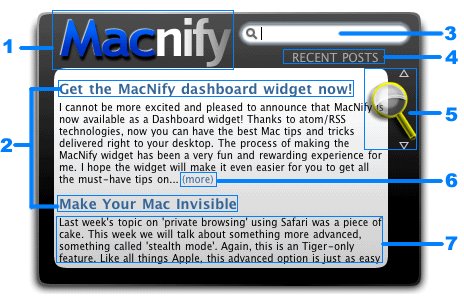
  1. Blog Title: Click to launch MacNify.blogspot.com in browser.

  2. Post Titles: Click to read the complete post in browser.

  3. Search Box: Allows you to do simple search within the MacNify website. To submit a search, type in keyword(s) and hit the 'enter' key. When left blank, the content area will display the recent posts on MacNify.

  4. Display Mode: Indicates whether the content area is displaying recent posts, or search results according the the keyword(s) in Search Box.

  5. Scrolling Glass: Drag up and down to scroll through the widget content area.

  6. (more): Click to open the webpage to read the entire post.

  7. Post Summary: A preview of the post content. Unlike the Post Title, the Post Summary does not respond to mouse-clicking events.

Saturday, November 05, 2005

MacNify Widget v1.1

Great news! The MacNify Widget version 1.1 has just been released!
Screenshot of MacNify Widget

What's new?

  • Solved conflict with the Macmentor Widget.
  • Huge increase in download bandwidth.
  • More stable linkage to the blog page.

Note: version 1.0 is no longer available for download.

Upgrade now

Get your copy of the MacNify Widget version 1.1 here.

The demand for the widget has been so great for the pass one month that I have to buy some more bandwidth to meet the needs. Thanks to our dear reader Jb who recommended the great web hosting service, but the offer he mentioned was over so I did not buy the package. Sorry about that.

In case you have not yet noticed, the MacNify widget has been among the top 10 for about two weeks now on Apple's widget website! Thanks everyone who have downloaded the widget and enjoyed reading the blog. My apology to those who have not been able to download it due to the stinky bandwidth issue. I have been getting a lot of feedbacks through the email and you guys are just great! I'll continue to make MacNify the place to go for essential tips and tricks that enhance our mac-ing time in small but significant ways.


p/s: I have sent some "pre-release" copies of version 1.1 to some readers who requested the widget through email, but I recommend that everyone should get the official release copy.

Friday, November 04, 2005

Free Your Widgets From Dashboard (Part II)

The "Toggle Widget-On-Top" mini app is finally here!

Since we talked about putting dashboard widgets directly on the desktop, I promised there will be a Part II, which makes the mini app available. I, for one, have been waiting to see the promise fulfilled. The day has finally come, and it's TODAY!

Get the mini app

If you are hardcore about doing the UNIX command yourself, follow the instructions in Part I. Else, download the mini-app and be happy!

Click the icon to download the mini app.

Run the mini app

  1. If you are using Safari to download the mini app, it should automatically unzip and mount the disk image for you. Else, unzip it manually and double click the .dmg file to mount the disk image yourself.

  2. Once you get the the disk image mounted, the rest are just usual routines. You can either run the mini app directly, or copy it to your Application folder and run it from there.


Show me the Mm...magic!

You are good to go after running the mini app. Now let's do the trick!
  1. Launch dashboard by clicking the dashboard toggle key (e.g. F12, depending on your settings in Preference->'Dashboard & Exposé').

  2. Click on any widget and drag a little. Here's the catch: while dragging, hit the dashboard toggle key once. WHALAH! Now the widget is on your desktop, and it stays on top of all windows, all the time!
*repeating step 2 with the widgets on your desktop will bring them back to dashboard.

Show it off

With this trick you can now use your favorite widgets without even launching the Dashboard, and perhaps wow a few friends who don't read MacNify!

Yet another Mac tip is on the web!

Thursday, November 03, 2005

A Plethora of File-opening Methods

Click-a-click

The easiest way of opening a file from the Finder is to double-click it. The downside of this method is that it launches the default application, often times not the one you wish to use. For instance, you wish to use PhotoShop Elements to do some image editing, but double-clicking the image file may launch Preview instead.

You do ask for the Menu, don't you

Another way is to ctrl+click on the file to pull down the floating menu, and choose your application of choice from the "Open With" submenu. I realize that the submenu may be a little slow at showing up especially when the file is supported by a large array of applications.

Drag 'n drop it!

This is the no-nonsense method to open a file in a target application of your choice. Just click and drag the file over the application icon and release it, much like the way you drag and drop a file to the Trash. The application icon can be sitting on the Dock, on the desktop, or in the Finder; in each case, this method works just fine.

Although you may not need all three methods as often in your daily Mac-ing hours, I am sure there will be at least one that you find most convenient to work with. Hope this plethora of tricks will speed up your computing efficiency in a small but significant way.

Yet another Mac tip is on the web!